
Earn & Learn
A peer-tutoring platform
that connects students based on individual learning needs
Type Individual Project
Role UX Designer
Tools Sketch, Balsamiq, Protopie, Adobe Illustrator, Adobe Premiere
Timespan Fall 2018 |
SI 582: Intro to Interaction Design - received the highest grade in class
The Challenge
The University of Michigan (UM) is a reputable, well-rounded public university with over 50,000 students and
faculty members.
One day, when I was having difficulties figuring out how to solve my website coding issues,
I thought,
‘Since we have so many intelligent students from such a wide range of disciplines, what
if I could
have a peer tutor providing me support and feedback in learning subjects I want to learn?’,
and then ‘What if UM
students
could have peer-tutoring platform based on their learning needs and everyone can be both a tutor and tutee?’
I decided to take this challenge for my individual project in class SI 582:
Introduction to Interaction Design, taught
by Professor McCarley.
In fact, I realized that many
UM students had been raising similar questions when they were unable to get help from school
resources or could not find a right person to tutor them on their problems together.
The Solution
Earn & Learn is an application
that connects UM students
based on
individual needs for learning. Learning subjects can be anything from courseworks to technical skills, and
students
can be a tutor or tutee.
Why this solution?
1) Effectiveness of peer tutoring
According to various research,
peer tutoring has its great benefits in higher learning achievement, improved relationships with peers, improved
personal and social development as well as increased motivation.
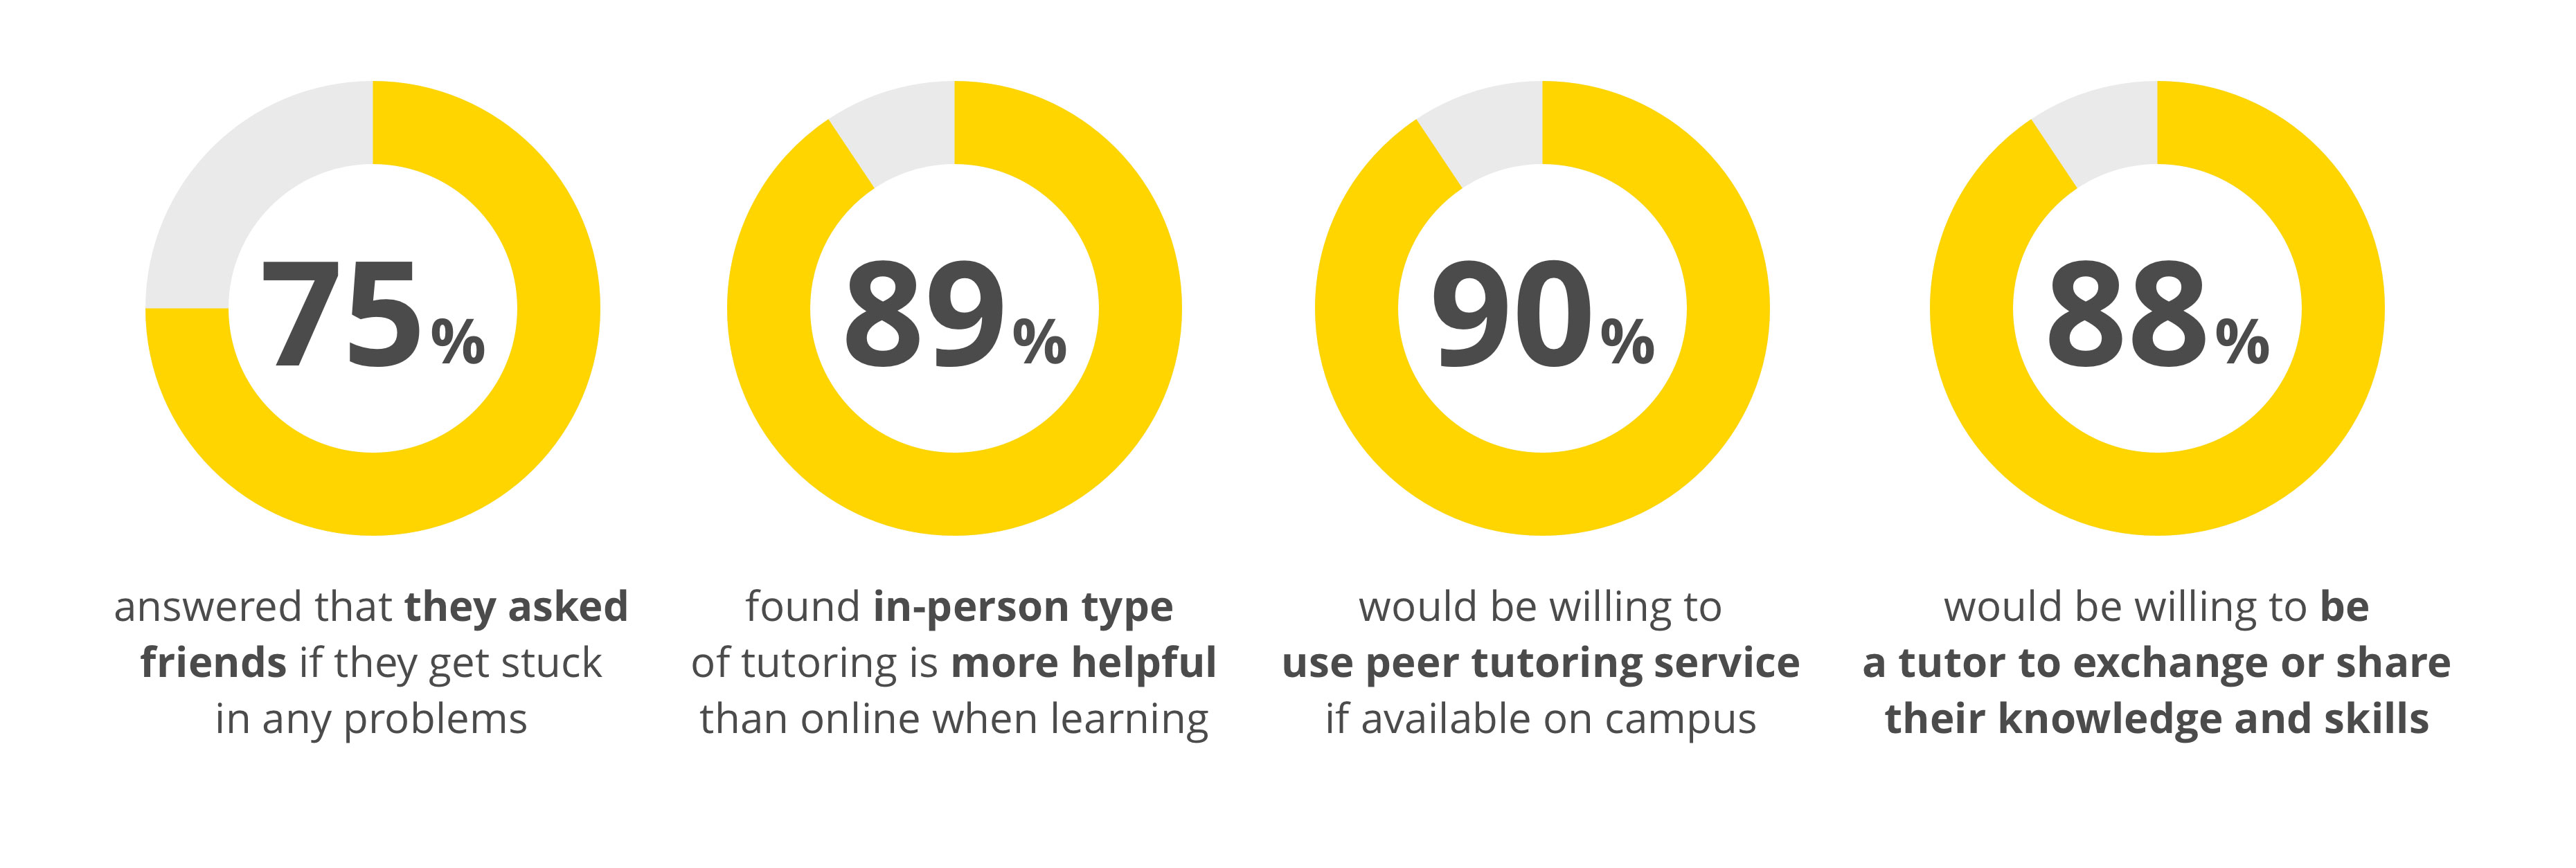
2) Great advantages of in-person tutoring
Many studies show that in-person, one-on-one tutoring is one of the most powerful
way of learning compared to other options. My research also shows that the majority of students found in-person
tutoring is more helpful than other options such as online education.
3) Fostering equality in access to in-person/private tutoring.
Regardless of its effectiveness, private tutoring has been too expensive for students. Through the solution,
students can explore more affordable options of in-person learning opportunity.
4) Providing meaningful economic activity/business opportunities for students
Tutors on the platform (anyone) can be a tutor to share their knowledge, make some money, as well as build
their own brand and business. This would open small and big business opportunities for students without heavy
upfront investment. When the solution prospers, this platform can be used to connect between students and employers
based on each party's needs.
JUMP PAST SOLUTION TO RESEARCH
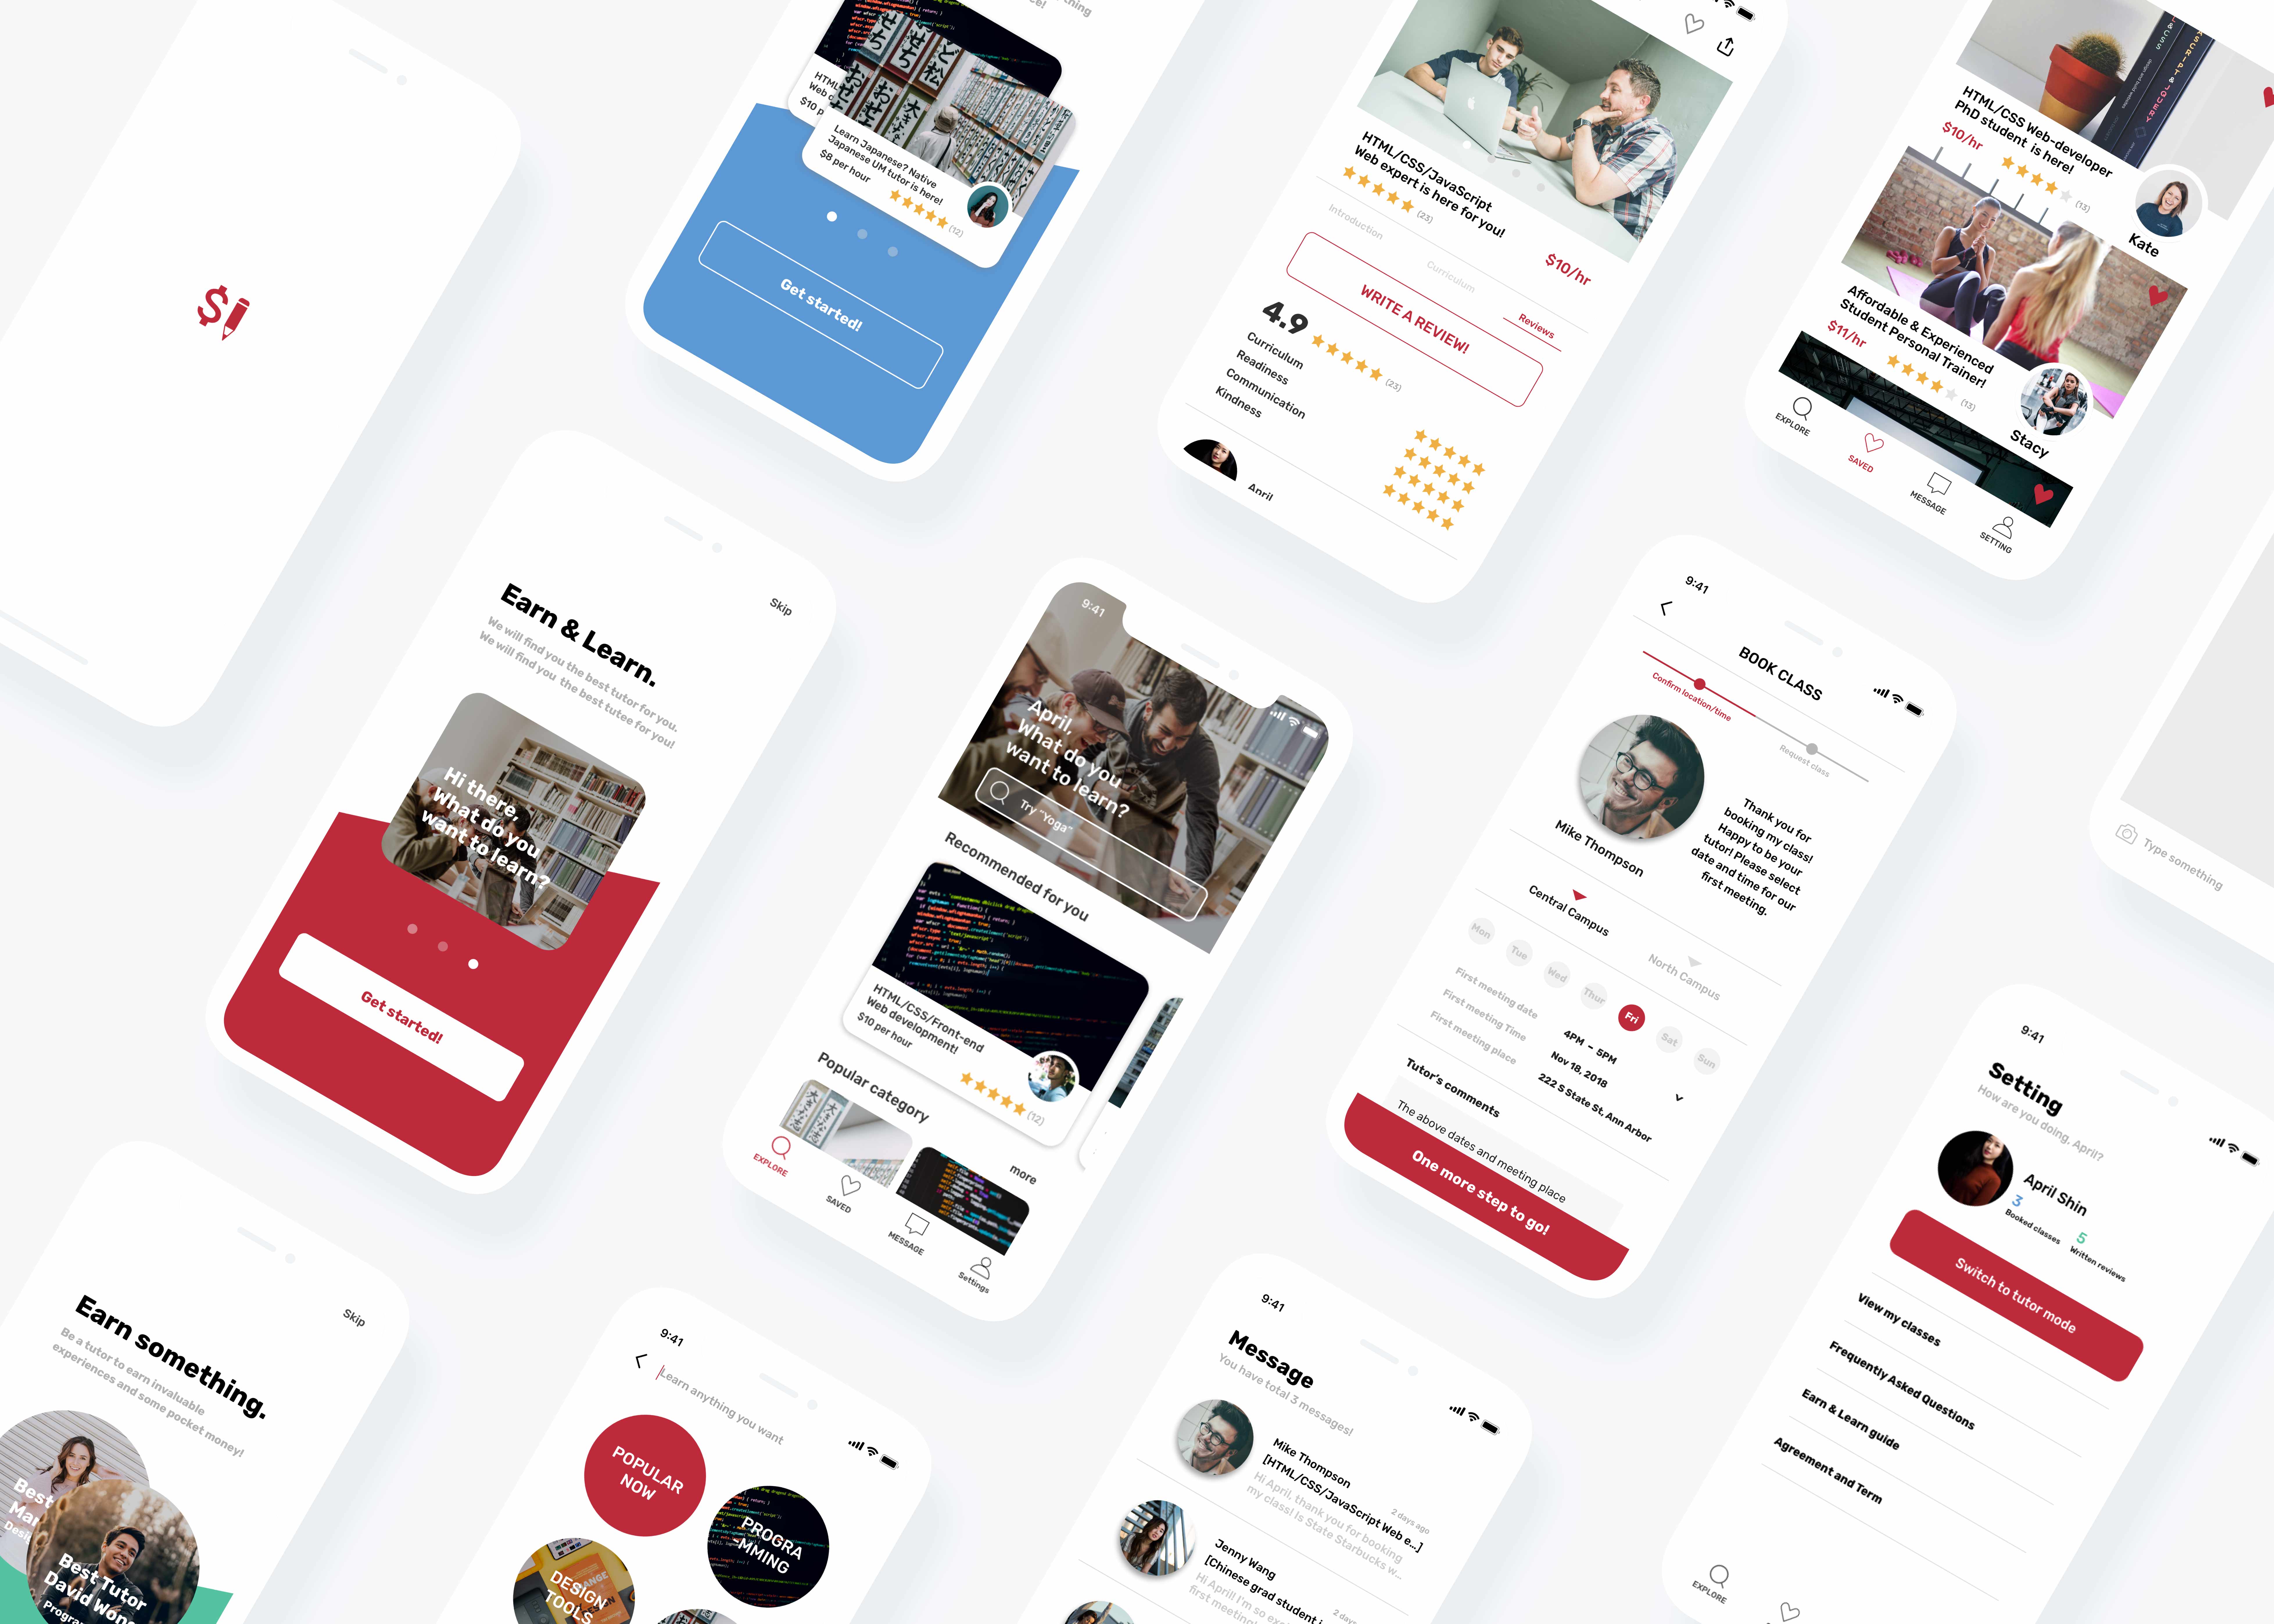
Prototyping & Key Features
1. Onboarding & Login
Clean onboarding screens allow users to get a quick sense of what the application does.
Various login options offer users efficient and convenient login experience.
I also do care about designing for accessibility. I critically consider the sufficient color contrast in my entire design. In login experience, I used both color and check-mark or error sign as the visual mean of conveying information in order to help people with low visual acuity or color blindness.
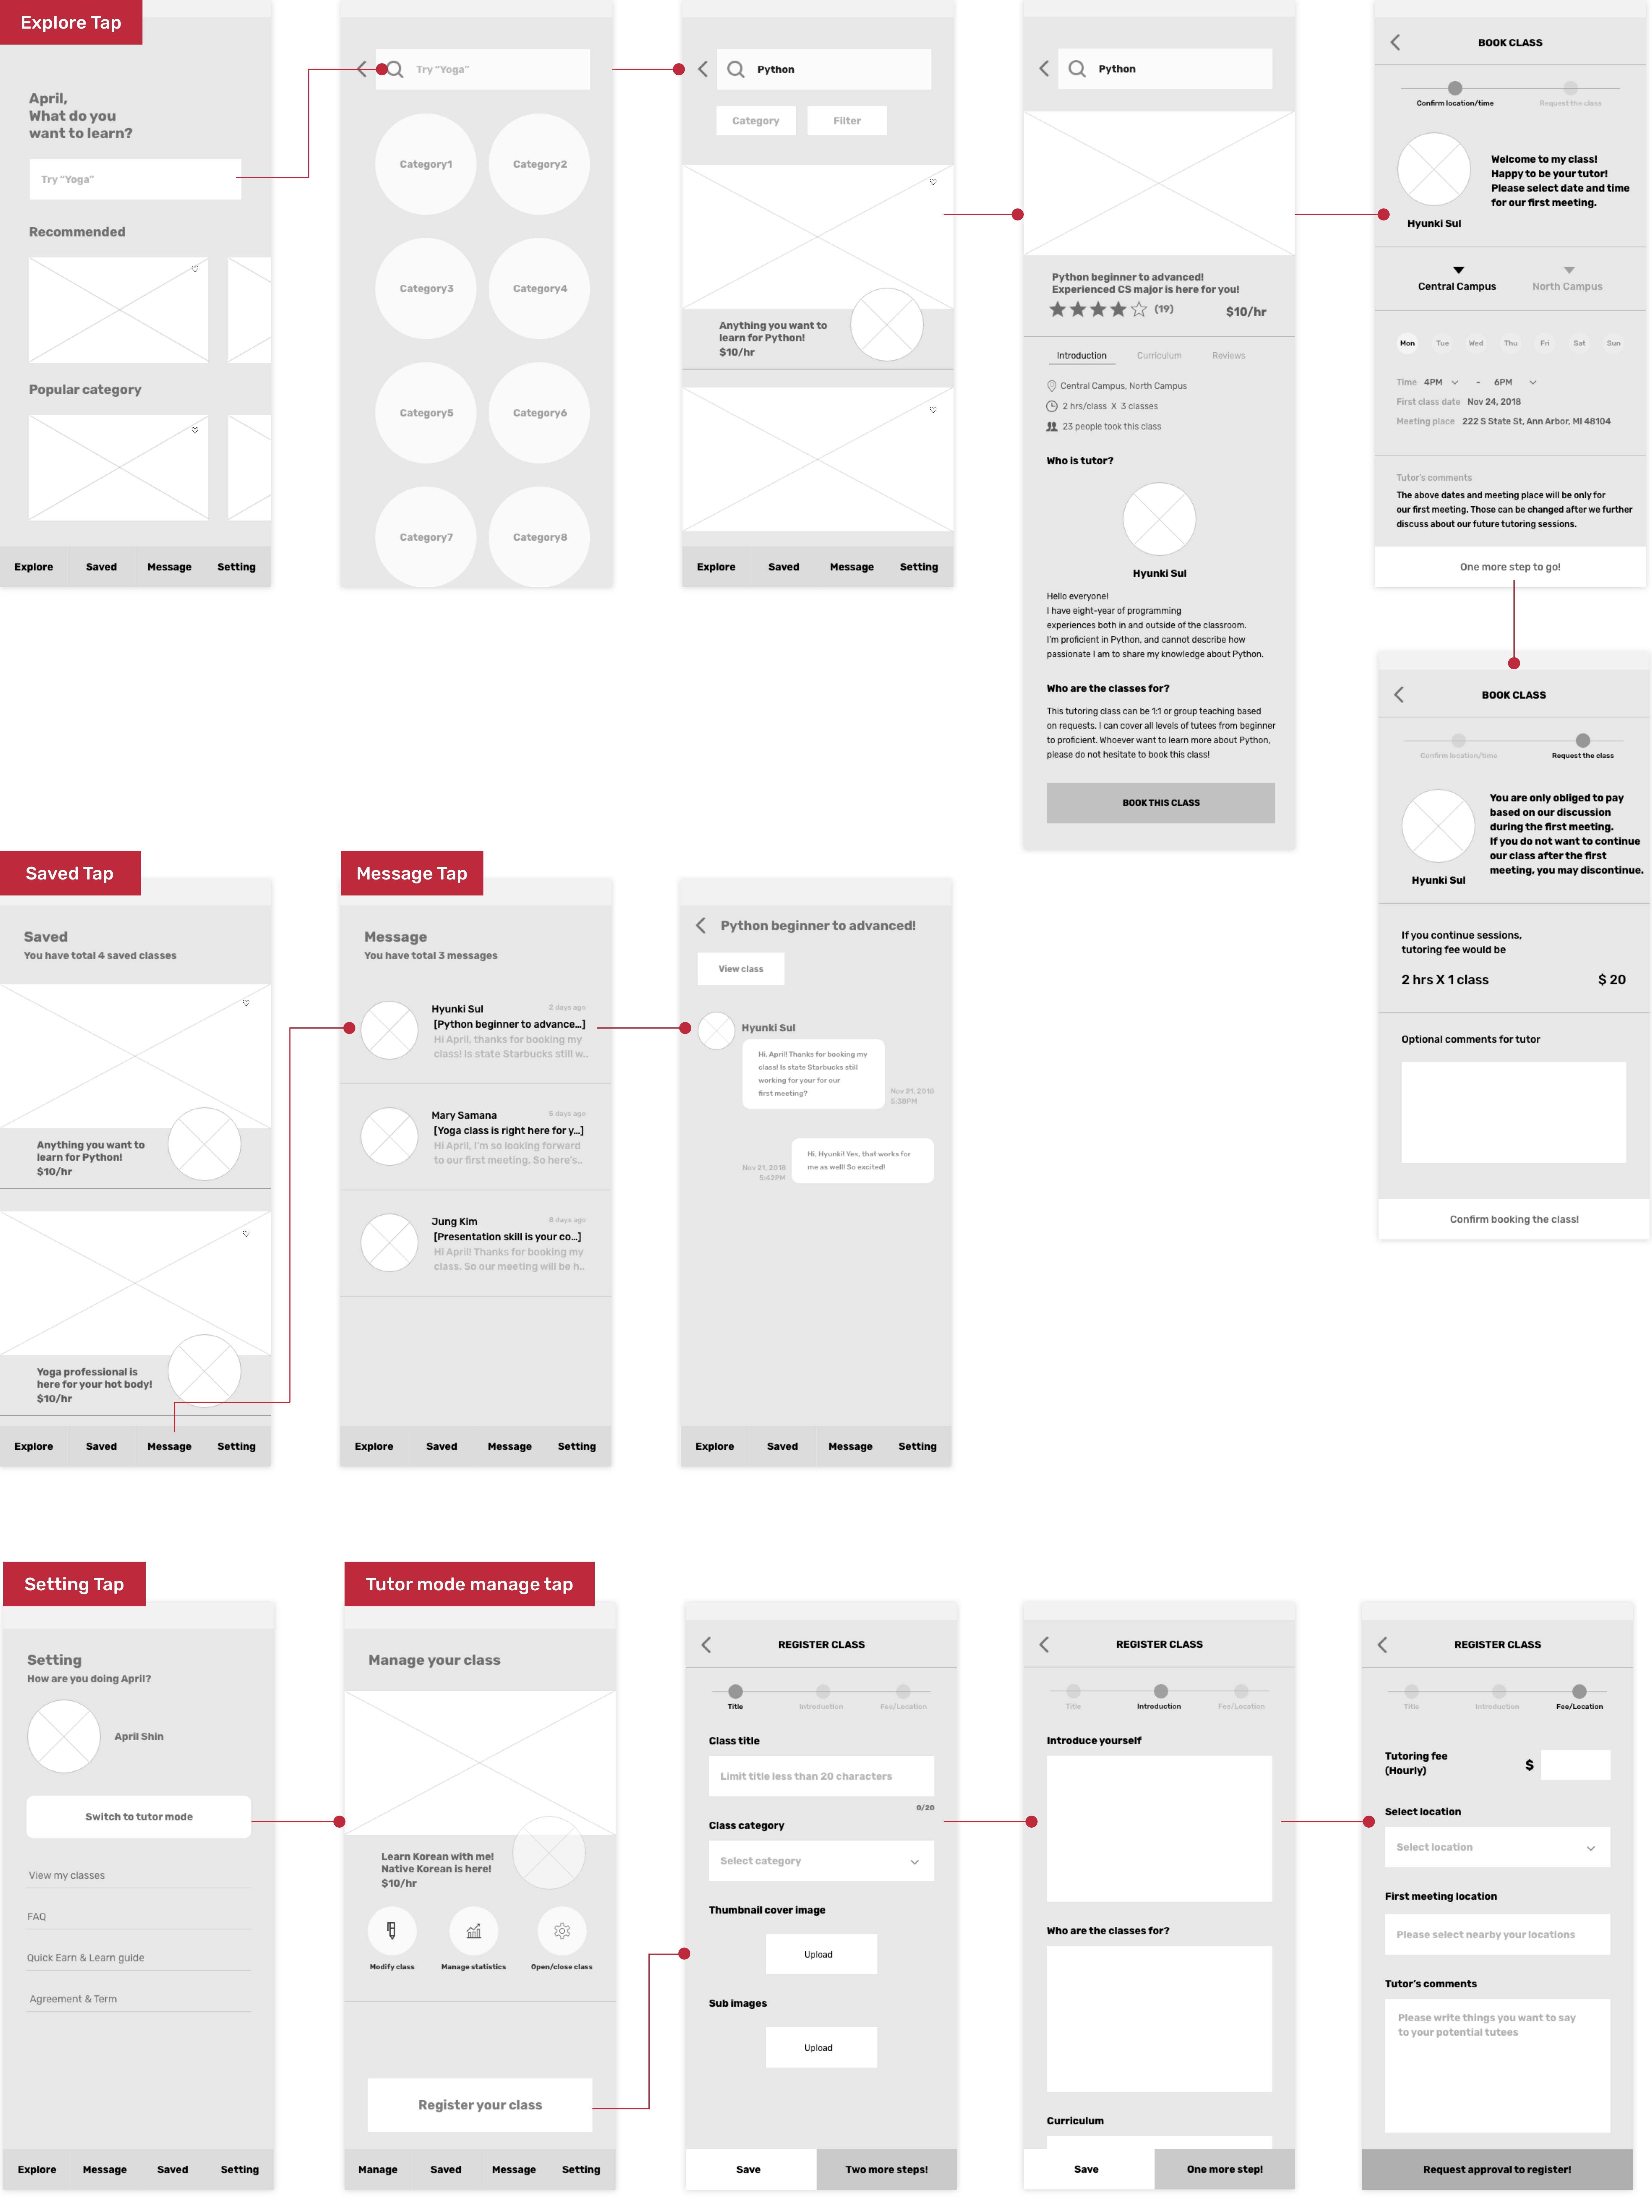
2. Explore & Save
Home screen allows users to explore diverse tutoring sessions through direct search or browsing contents.
Users directly search for learning subjects by using filters to get tailored search results.
Users can save their wish-list classes to Saved tap for the future use.
3. Explore in Detail
Once users find classes that sound interesting, they can go further explore in detail. All necessary information is right there at once.
Users can quickly look at details about the tutor, class, curriculum, and reviews. Once they like the class, they can either save it to the Saved tap, or book the class immediately.
4. Book Classes
Users select when and where to meet based on previous input from tutors. This will be immediately notified by tutors and tutors can review tutee's request and directly message them to confirm.
I intentionally let tutors be a communication starter. From my user feedbacks, potential tutors are concerned if they would be contacted by random, non-serious users.
In this regard, I let tutees to contact to tutors first by booking the class without payment, but let tutors be the one who accept the request and start messaging.
5. Message functions
Once users book classes, tutors will be immediately notified that someone booked their class. They can find these request through tutor mode message tap. Tutors can either accept or deny tutee's request. If tutors want to accept the request, tutors can simply message tutees to start conversation.
Users can send both texts and photos through the message. By tapping camera icon, users would see their partial camera roll instantly and be able to view full camera roll by tapping view cameral roll.
Users can either take photos or use their existing pictures.
6. Switch to Tutor Mode & Register classes
Users always can be both a tutor and tutee. They can switch to tutor mode by going to Setting tap.
In tutor mode, users can manage and register their classes easily and conveniently. Saved tap is where tutors can find their classes, which they did Save for later in the process of registering.
Messgae tap allows tutors to notify tutee's request and initiate conversations.
7. View statistics and Close classes
Tutors can easily view statistics and get information about their classes.
Whenever tutors want to temporarily or permanently close classes, they can easily do it through this Manage tap.
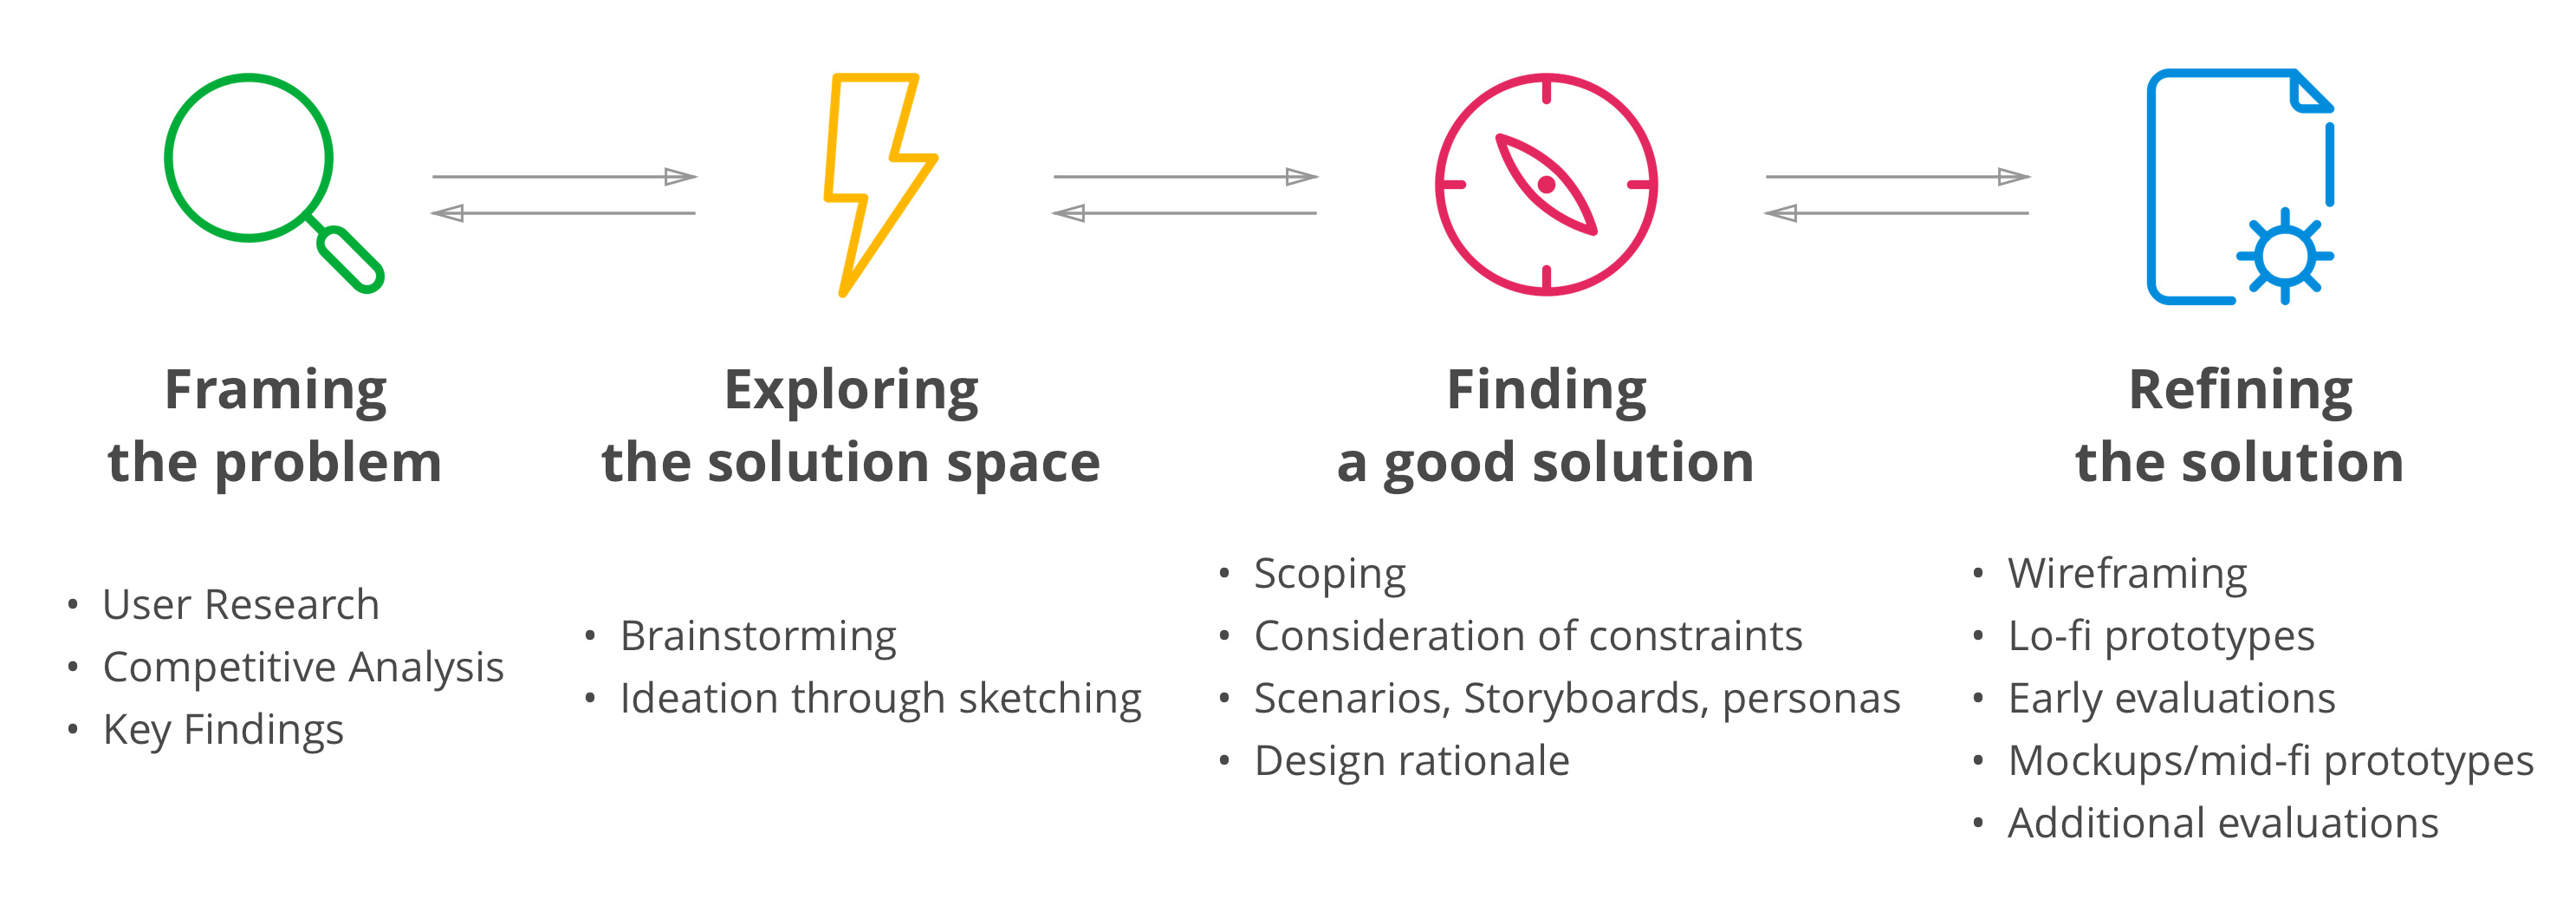
Approach
I followed the user-centered approach as below:
When I approached the problem, Professor
McCarley highly emphasized the following:
“ ... I don’t care about how fancy your design would be. UX design is NOT
graphic design anymore. In your field of work,
there is a huge possibility that you will be given existing design guidelines. So, again, UX Design is not
about
artwork, but all about problem-solving. UX Designer always should think 'am I really solving my users’ problems?'..."
That was powerful advice for me that I tried my very best to keep her words in mind as I approached
each stage of problem-solving.
Framing the problem
In this stage, I conducted user research and competitive analysis
to frame the problem.
For user research, I utilized methods of survey and user
interviews.
For competitive analysis, I took a critical look at existing solutions within my context and analyzed
their pros and cons in respect to supporting my target activity.
I particularly selected four key players in the industry, and conducted competitive assessment.
I was thereby able to compile a list of problems or frustrating aspects of the current
solutions.
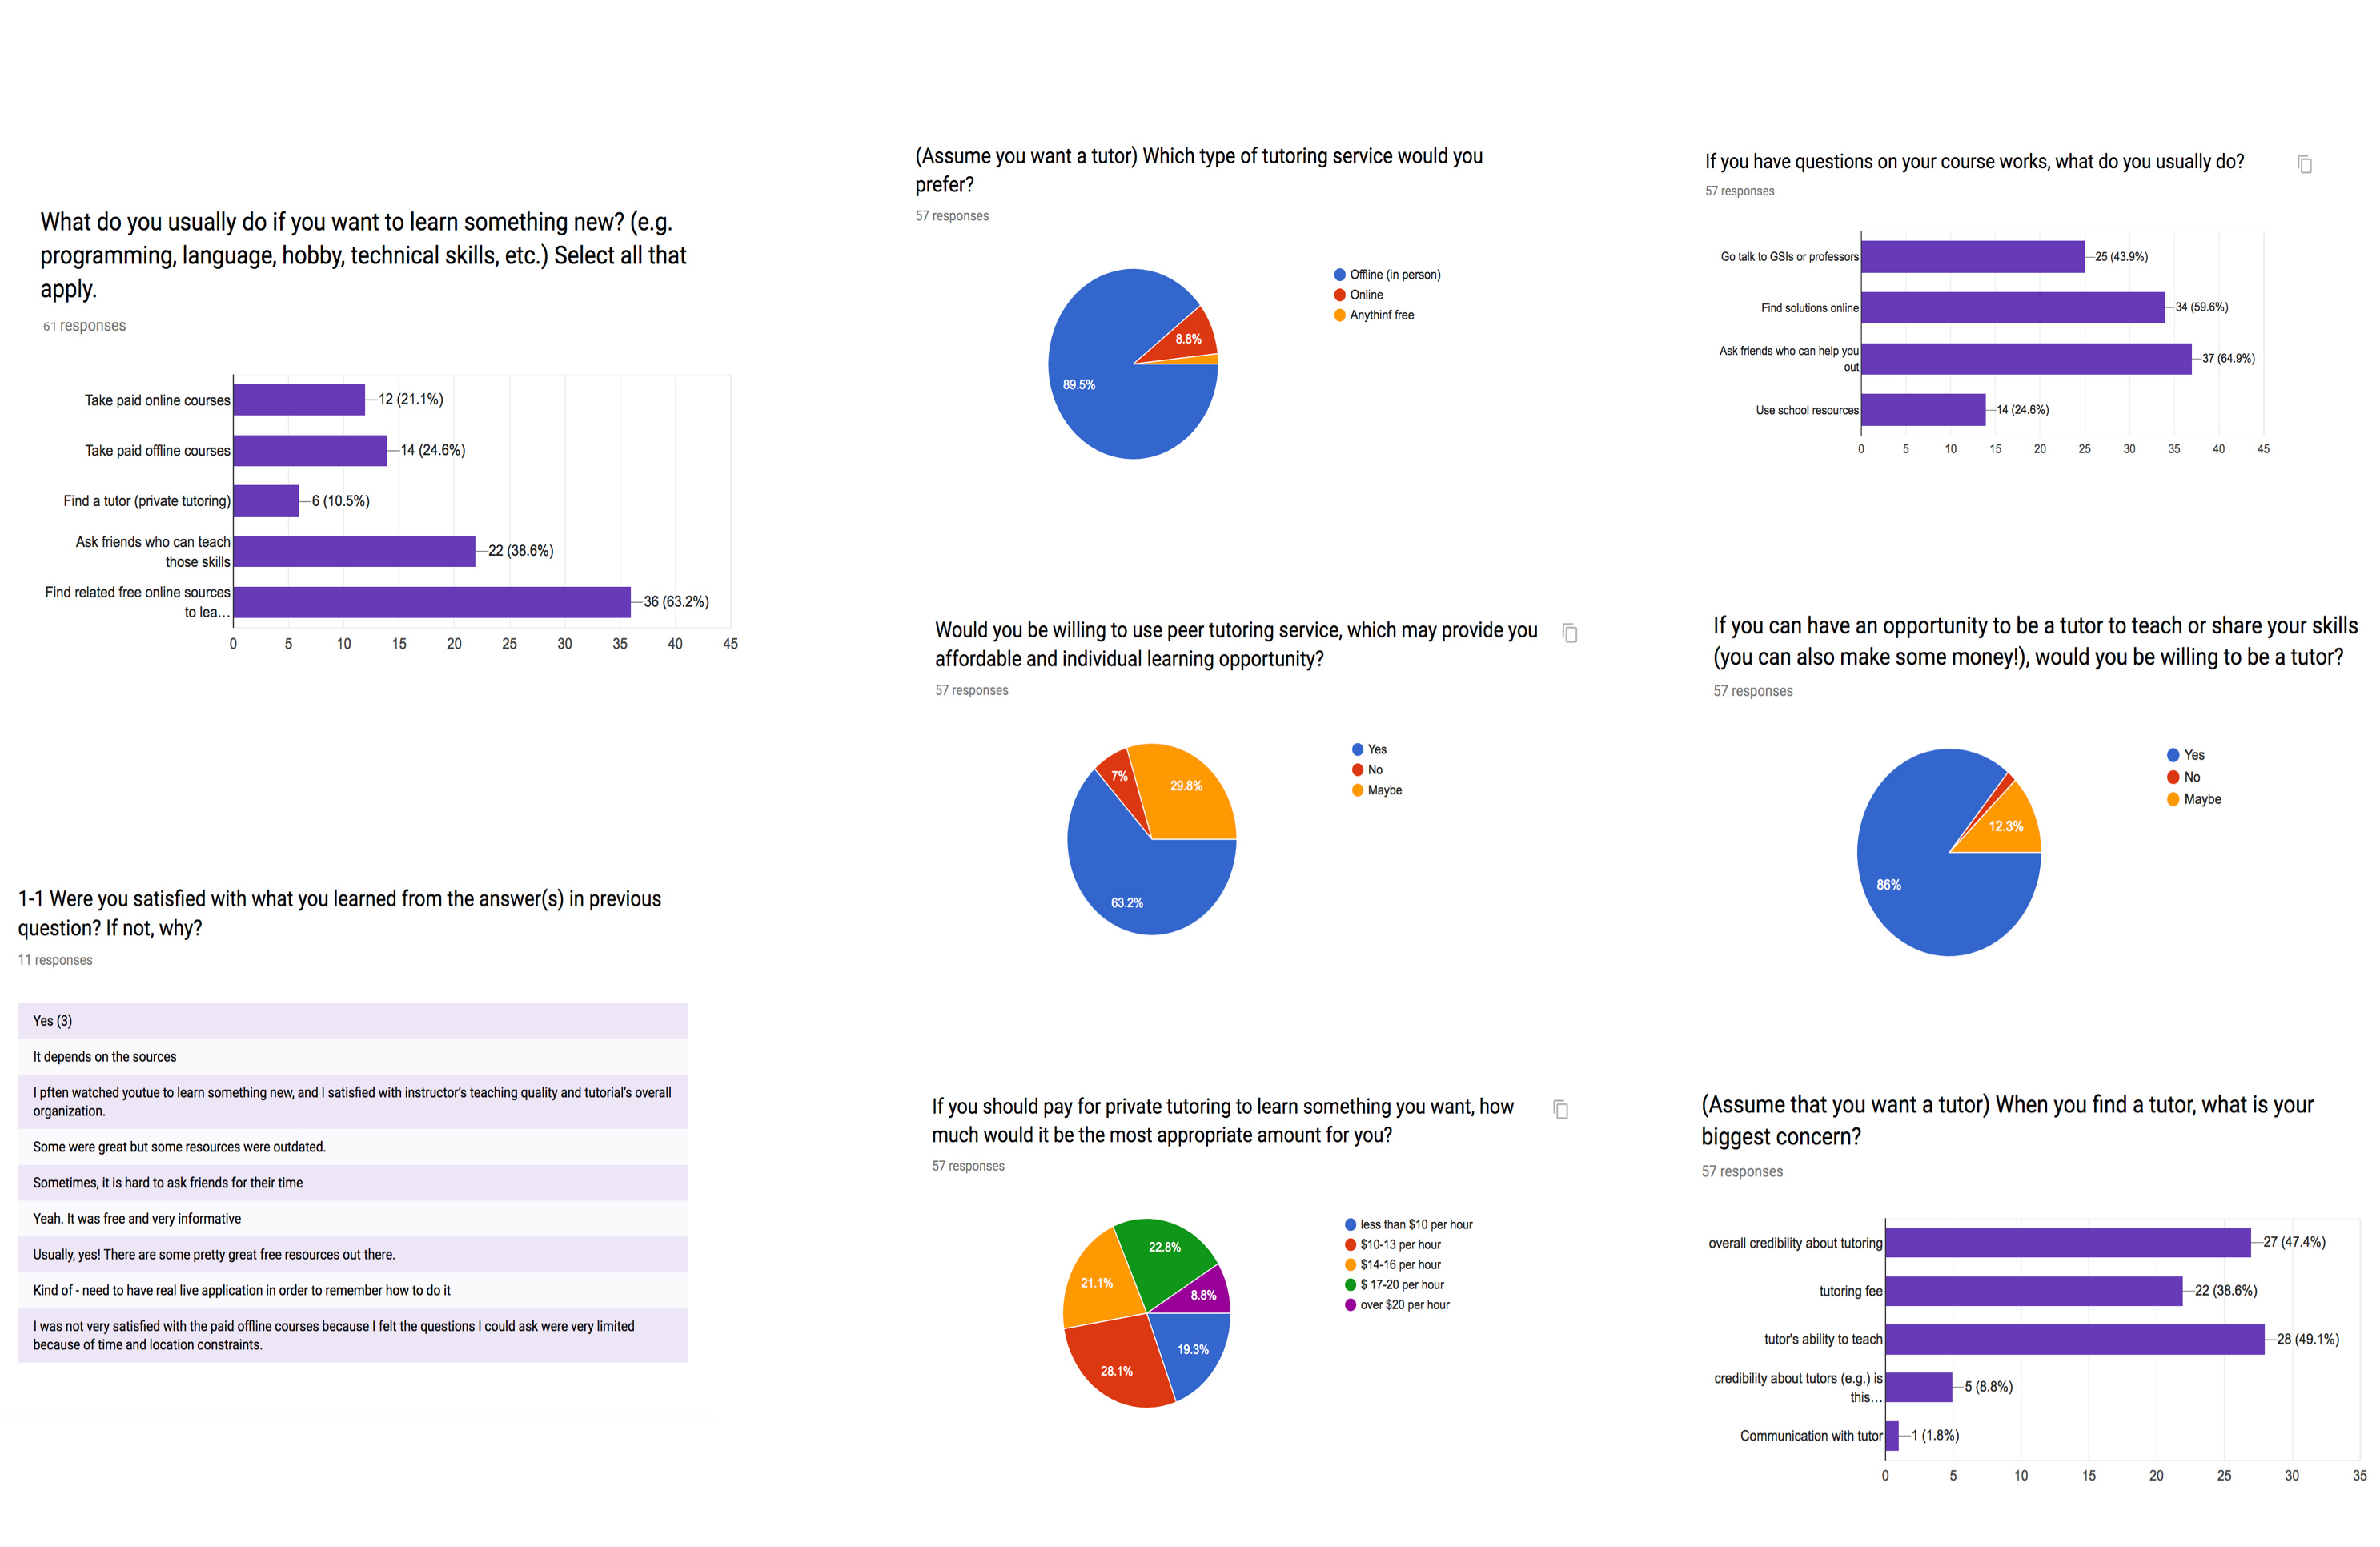
User Research: Survey & User Interviews
I initially designed survey with 30+ questions, discussed with professor, and narrowed it down to less than 10 key questions. After, I conducted interviews with 4 users.
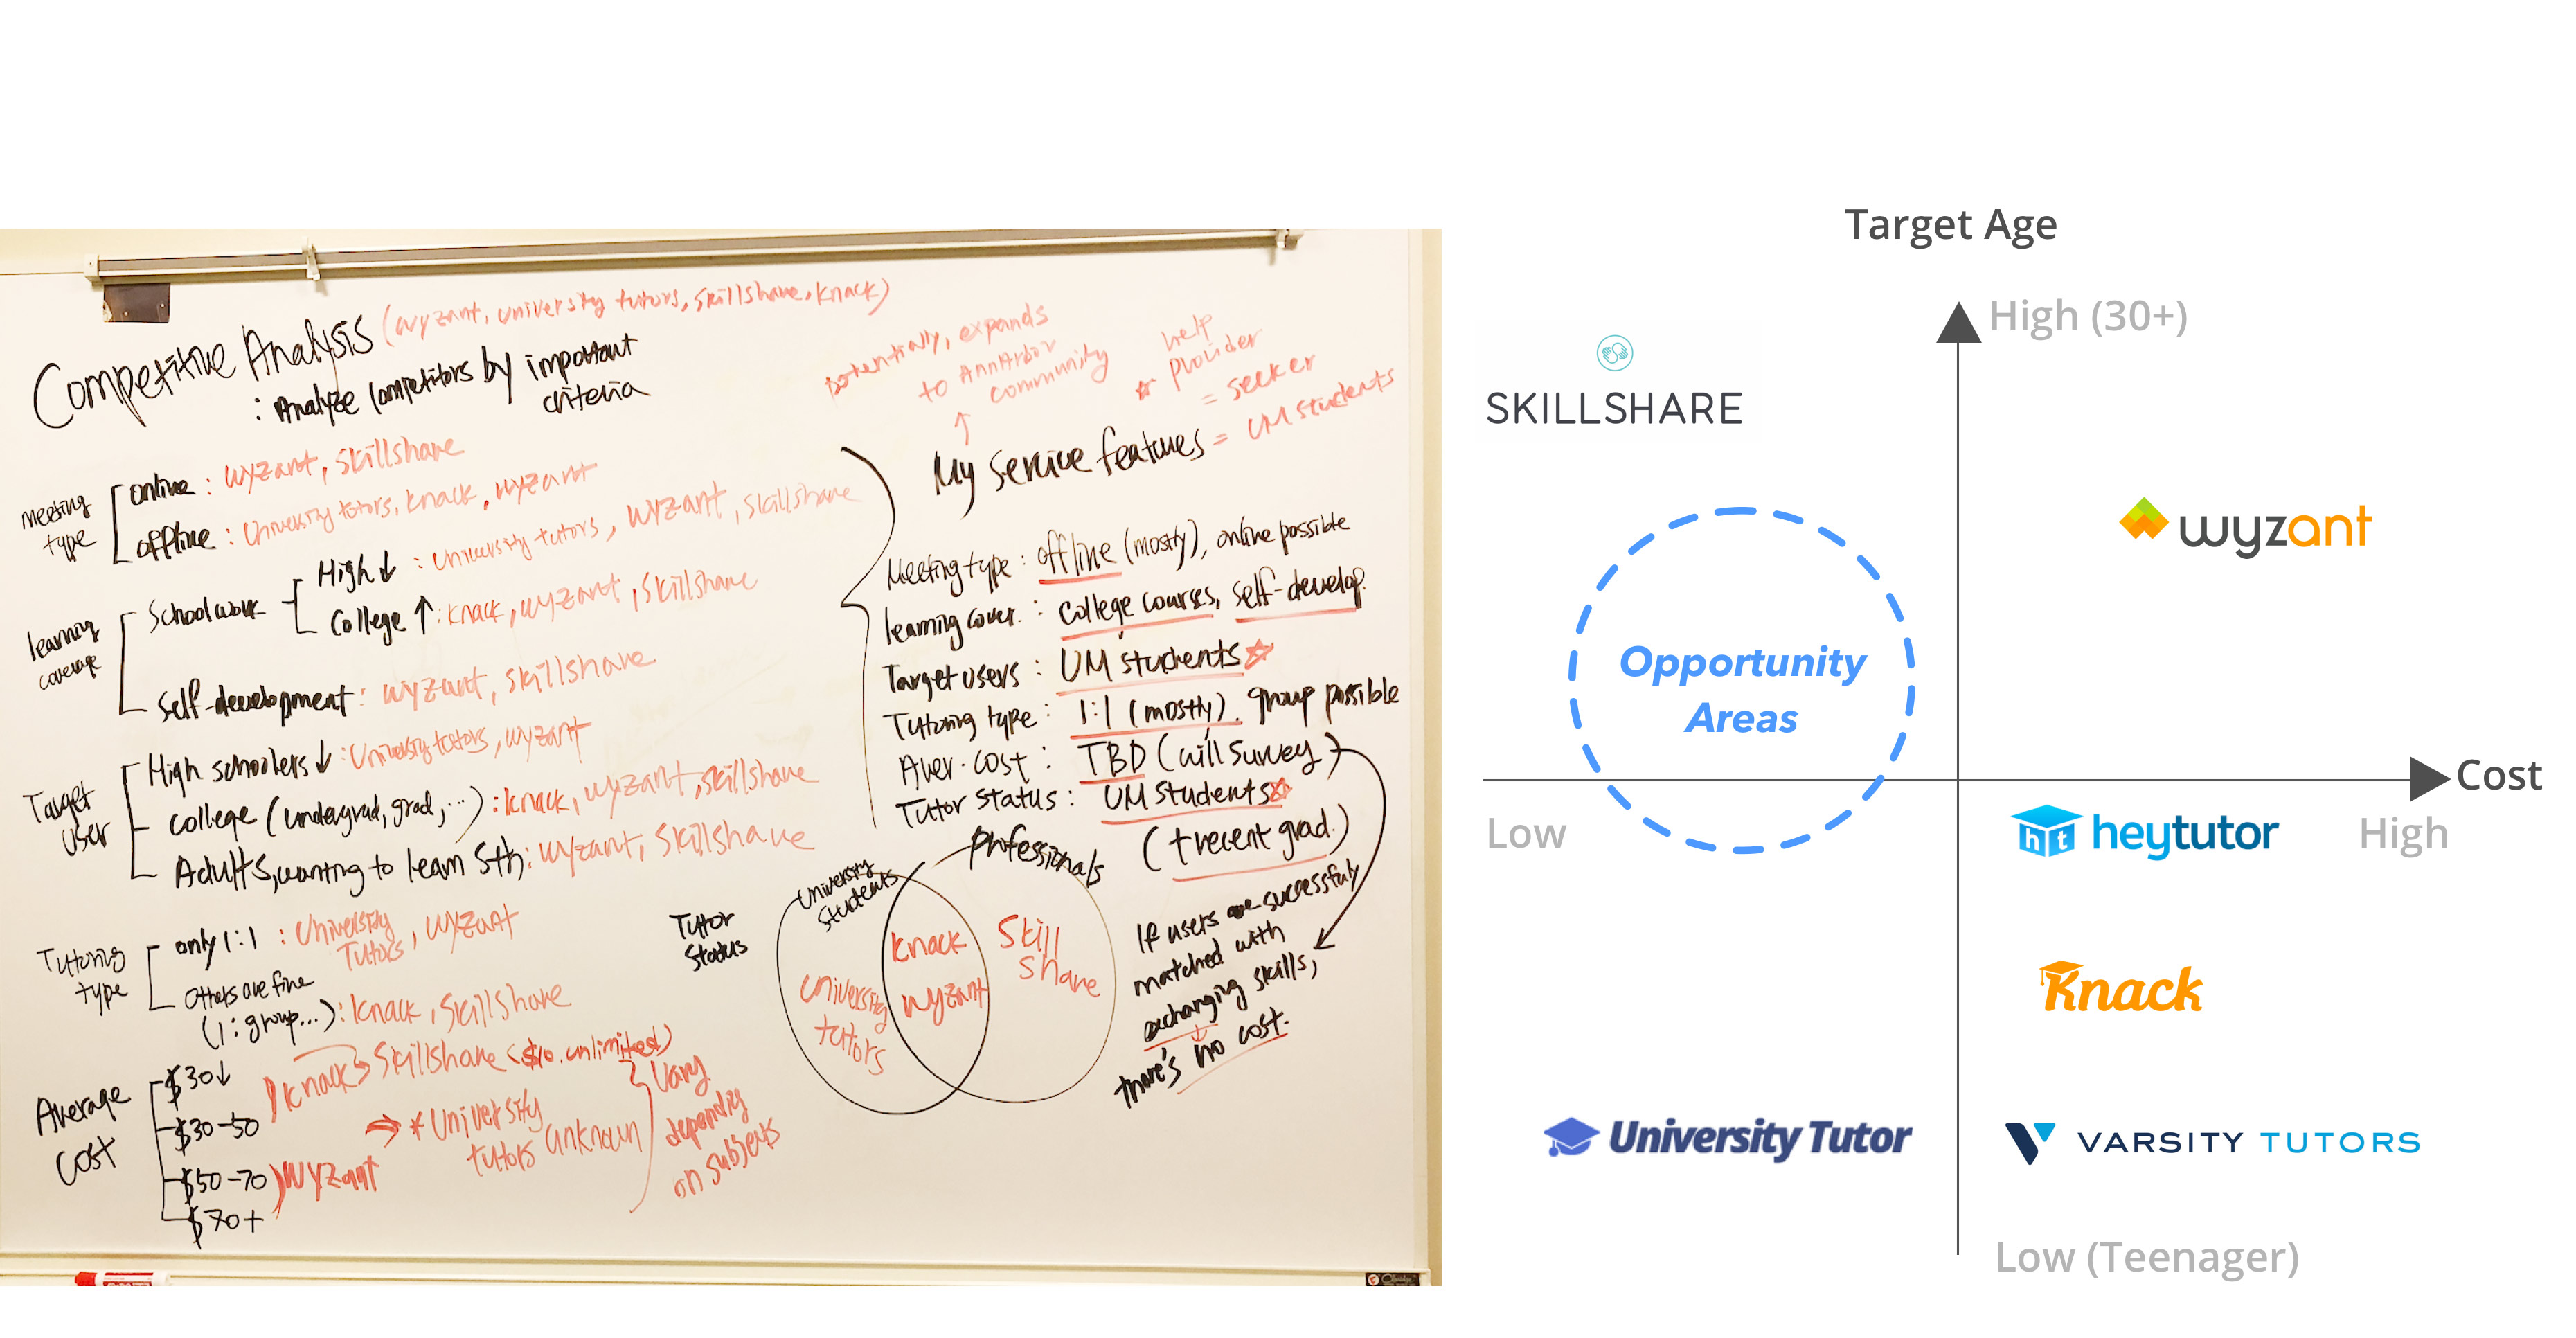
Competitive Analysis and Assessment
I took a careful look at existing solutions within my context and analyzed their pros and
cons in respect to supporting my target activity. I choose four key dominant industry players and two school tutoring resources for competitive analysis.
After, I conducted competitive assessment to discover opportunity areas.
View full competitive analysis
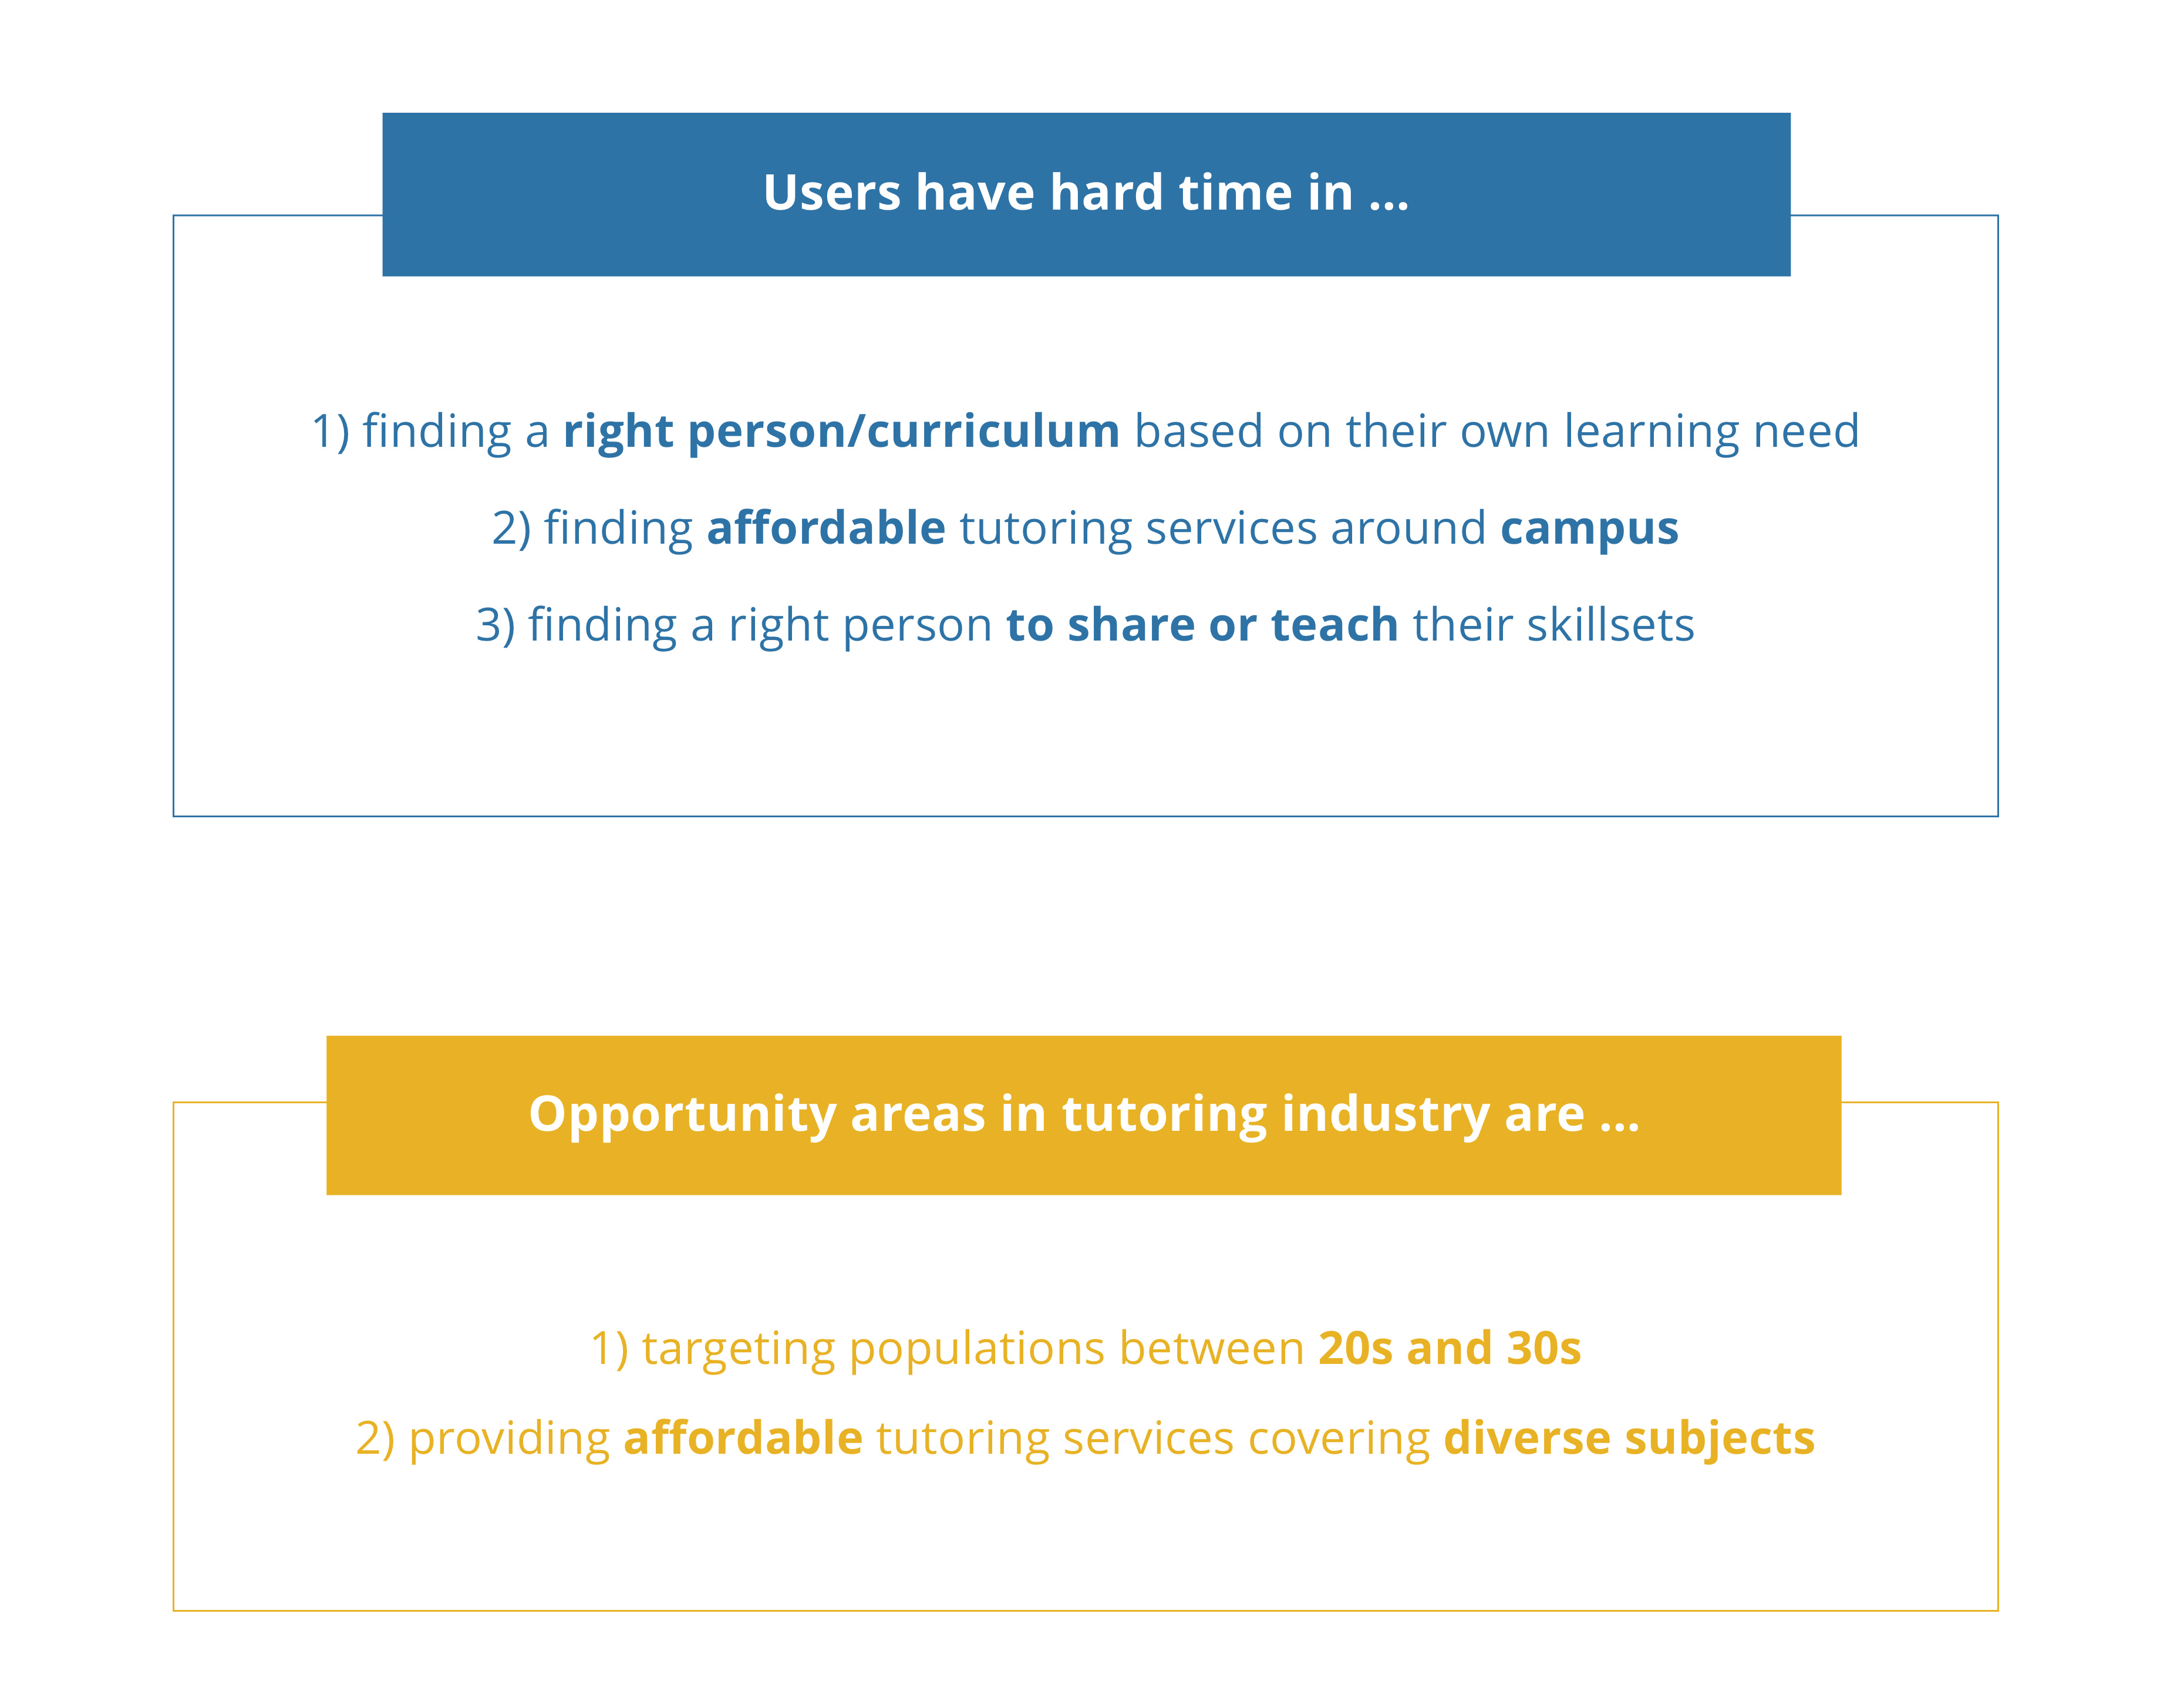
Key Findings
Combining data from user research and competitive analysis, I gained key findings like below and able to validate my initial challenge.
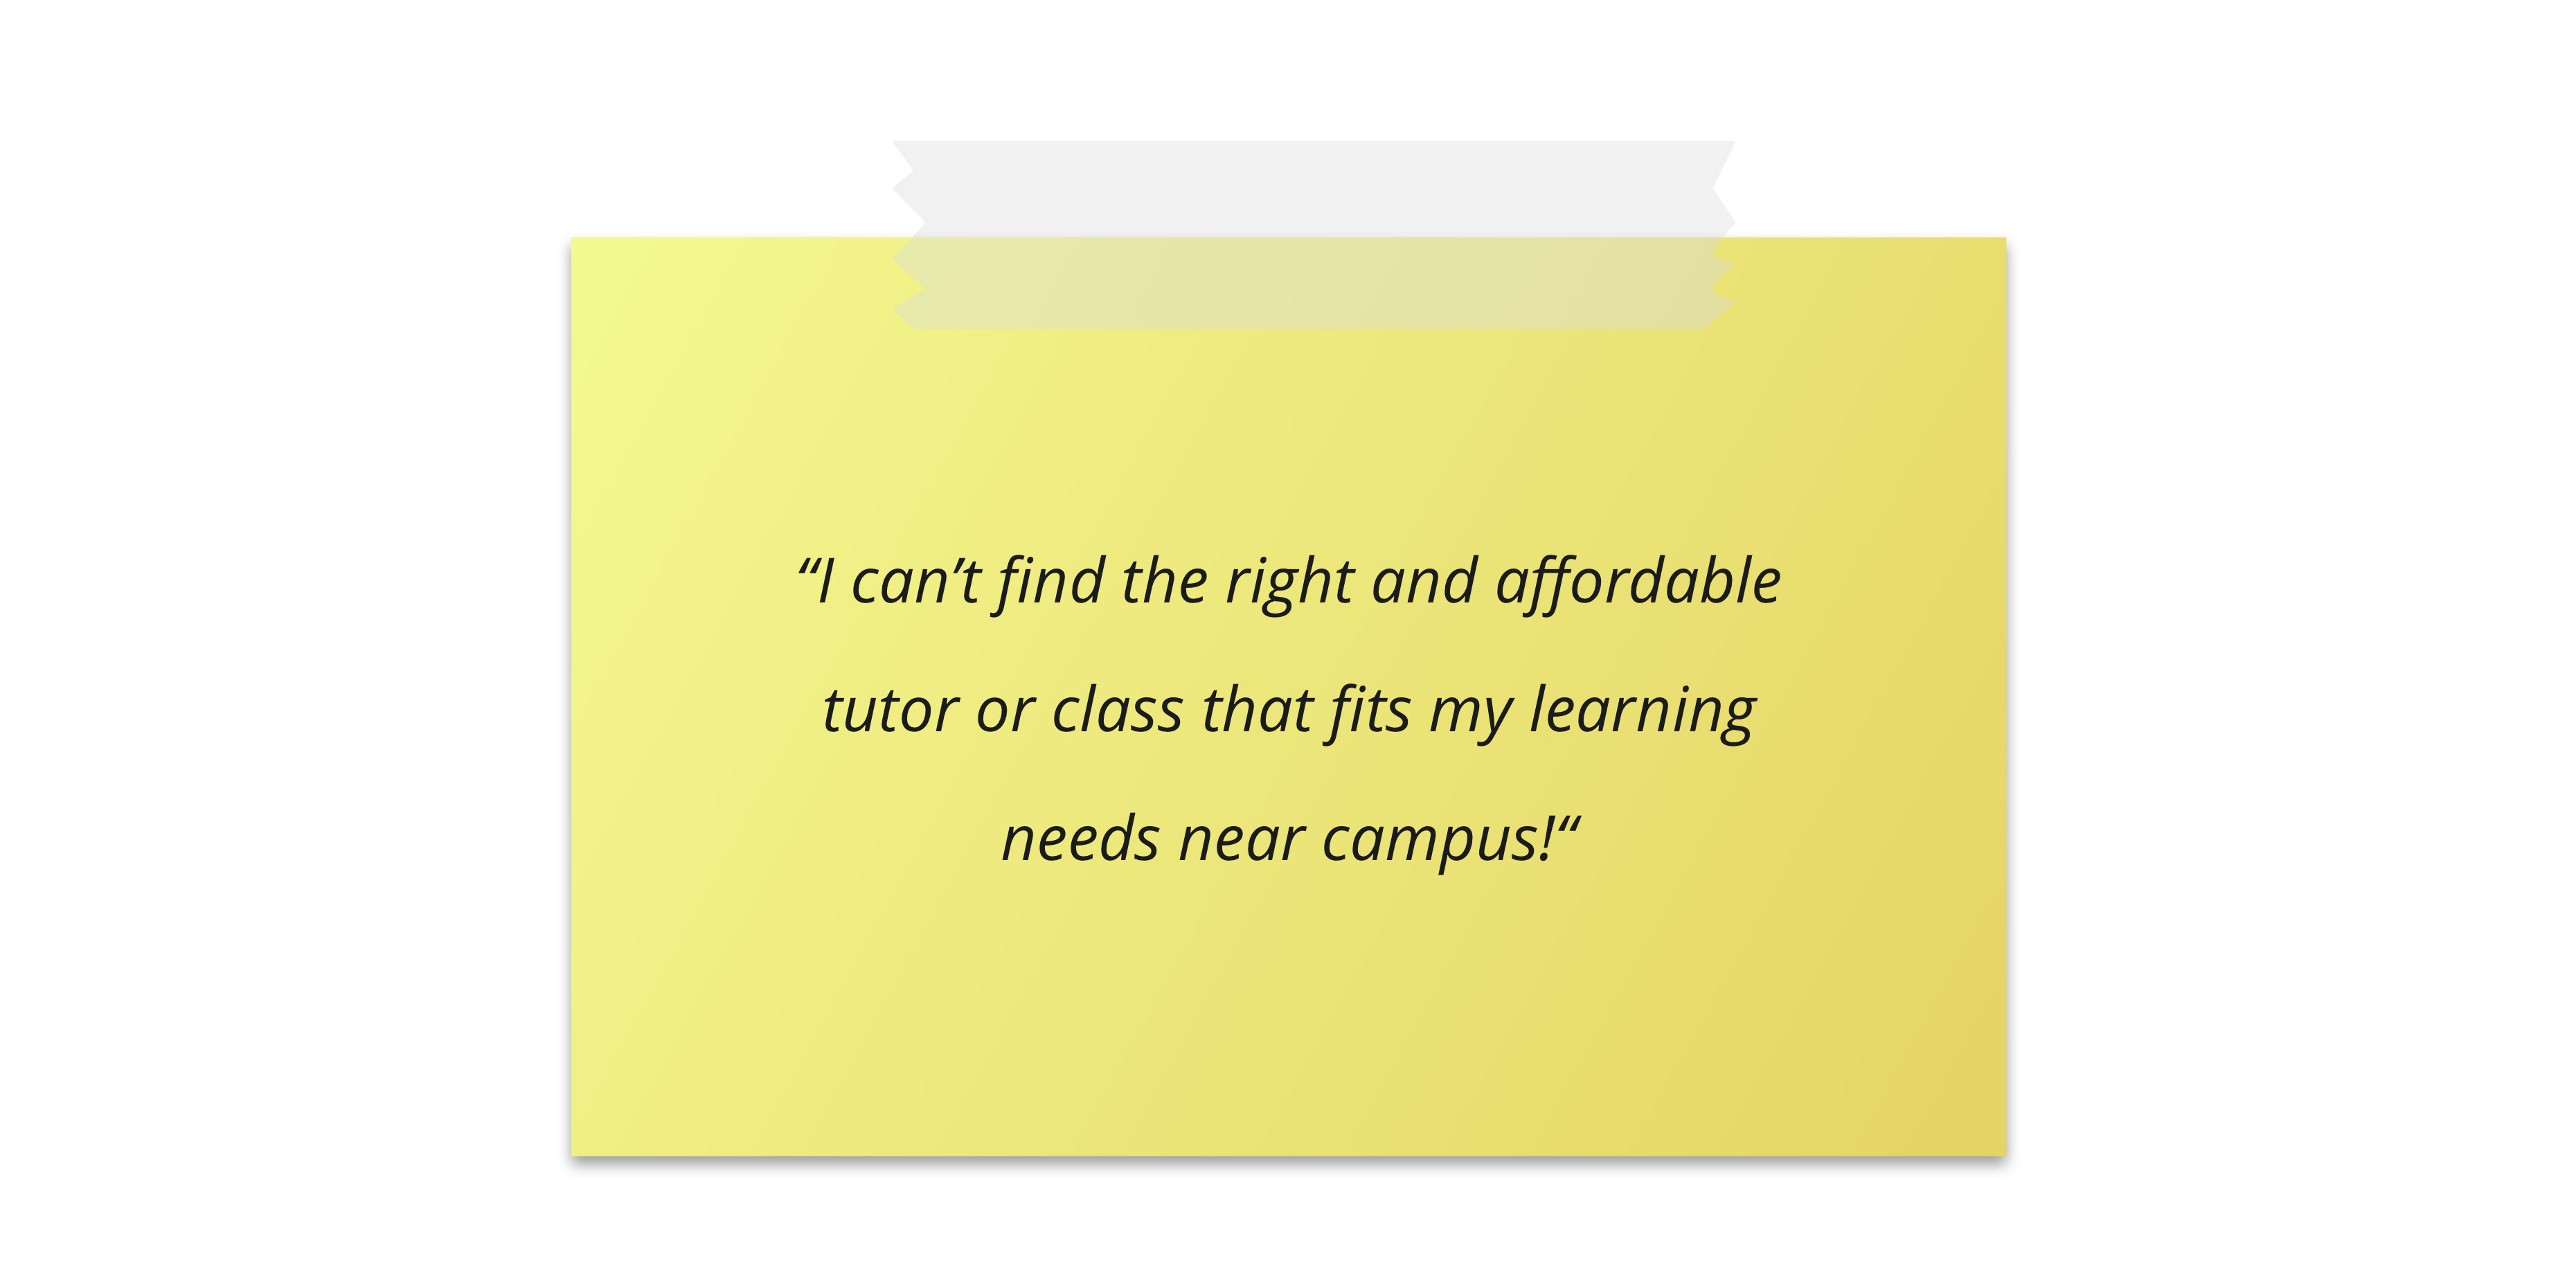
Problem Statement
Based on previous findings, I finally wrote user problem statement.
Exploring the solution space
In this stage, I conducted the following two methods: brainstorming and ideation
through sketch. In class, we had
training about rapid brainstorming with structure with the group. We choose two axes for our design matrix and
brainstormed based on the given instructions. This helped me a lot in expanding my ideas and developing
creativity.
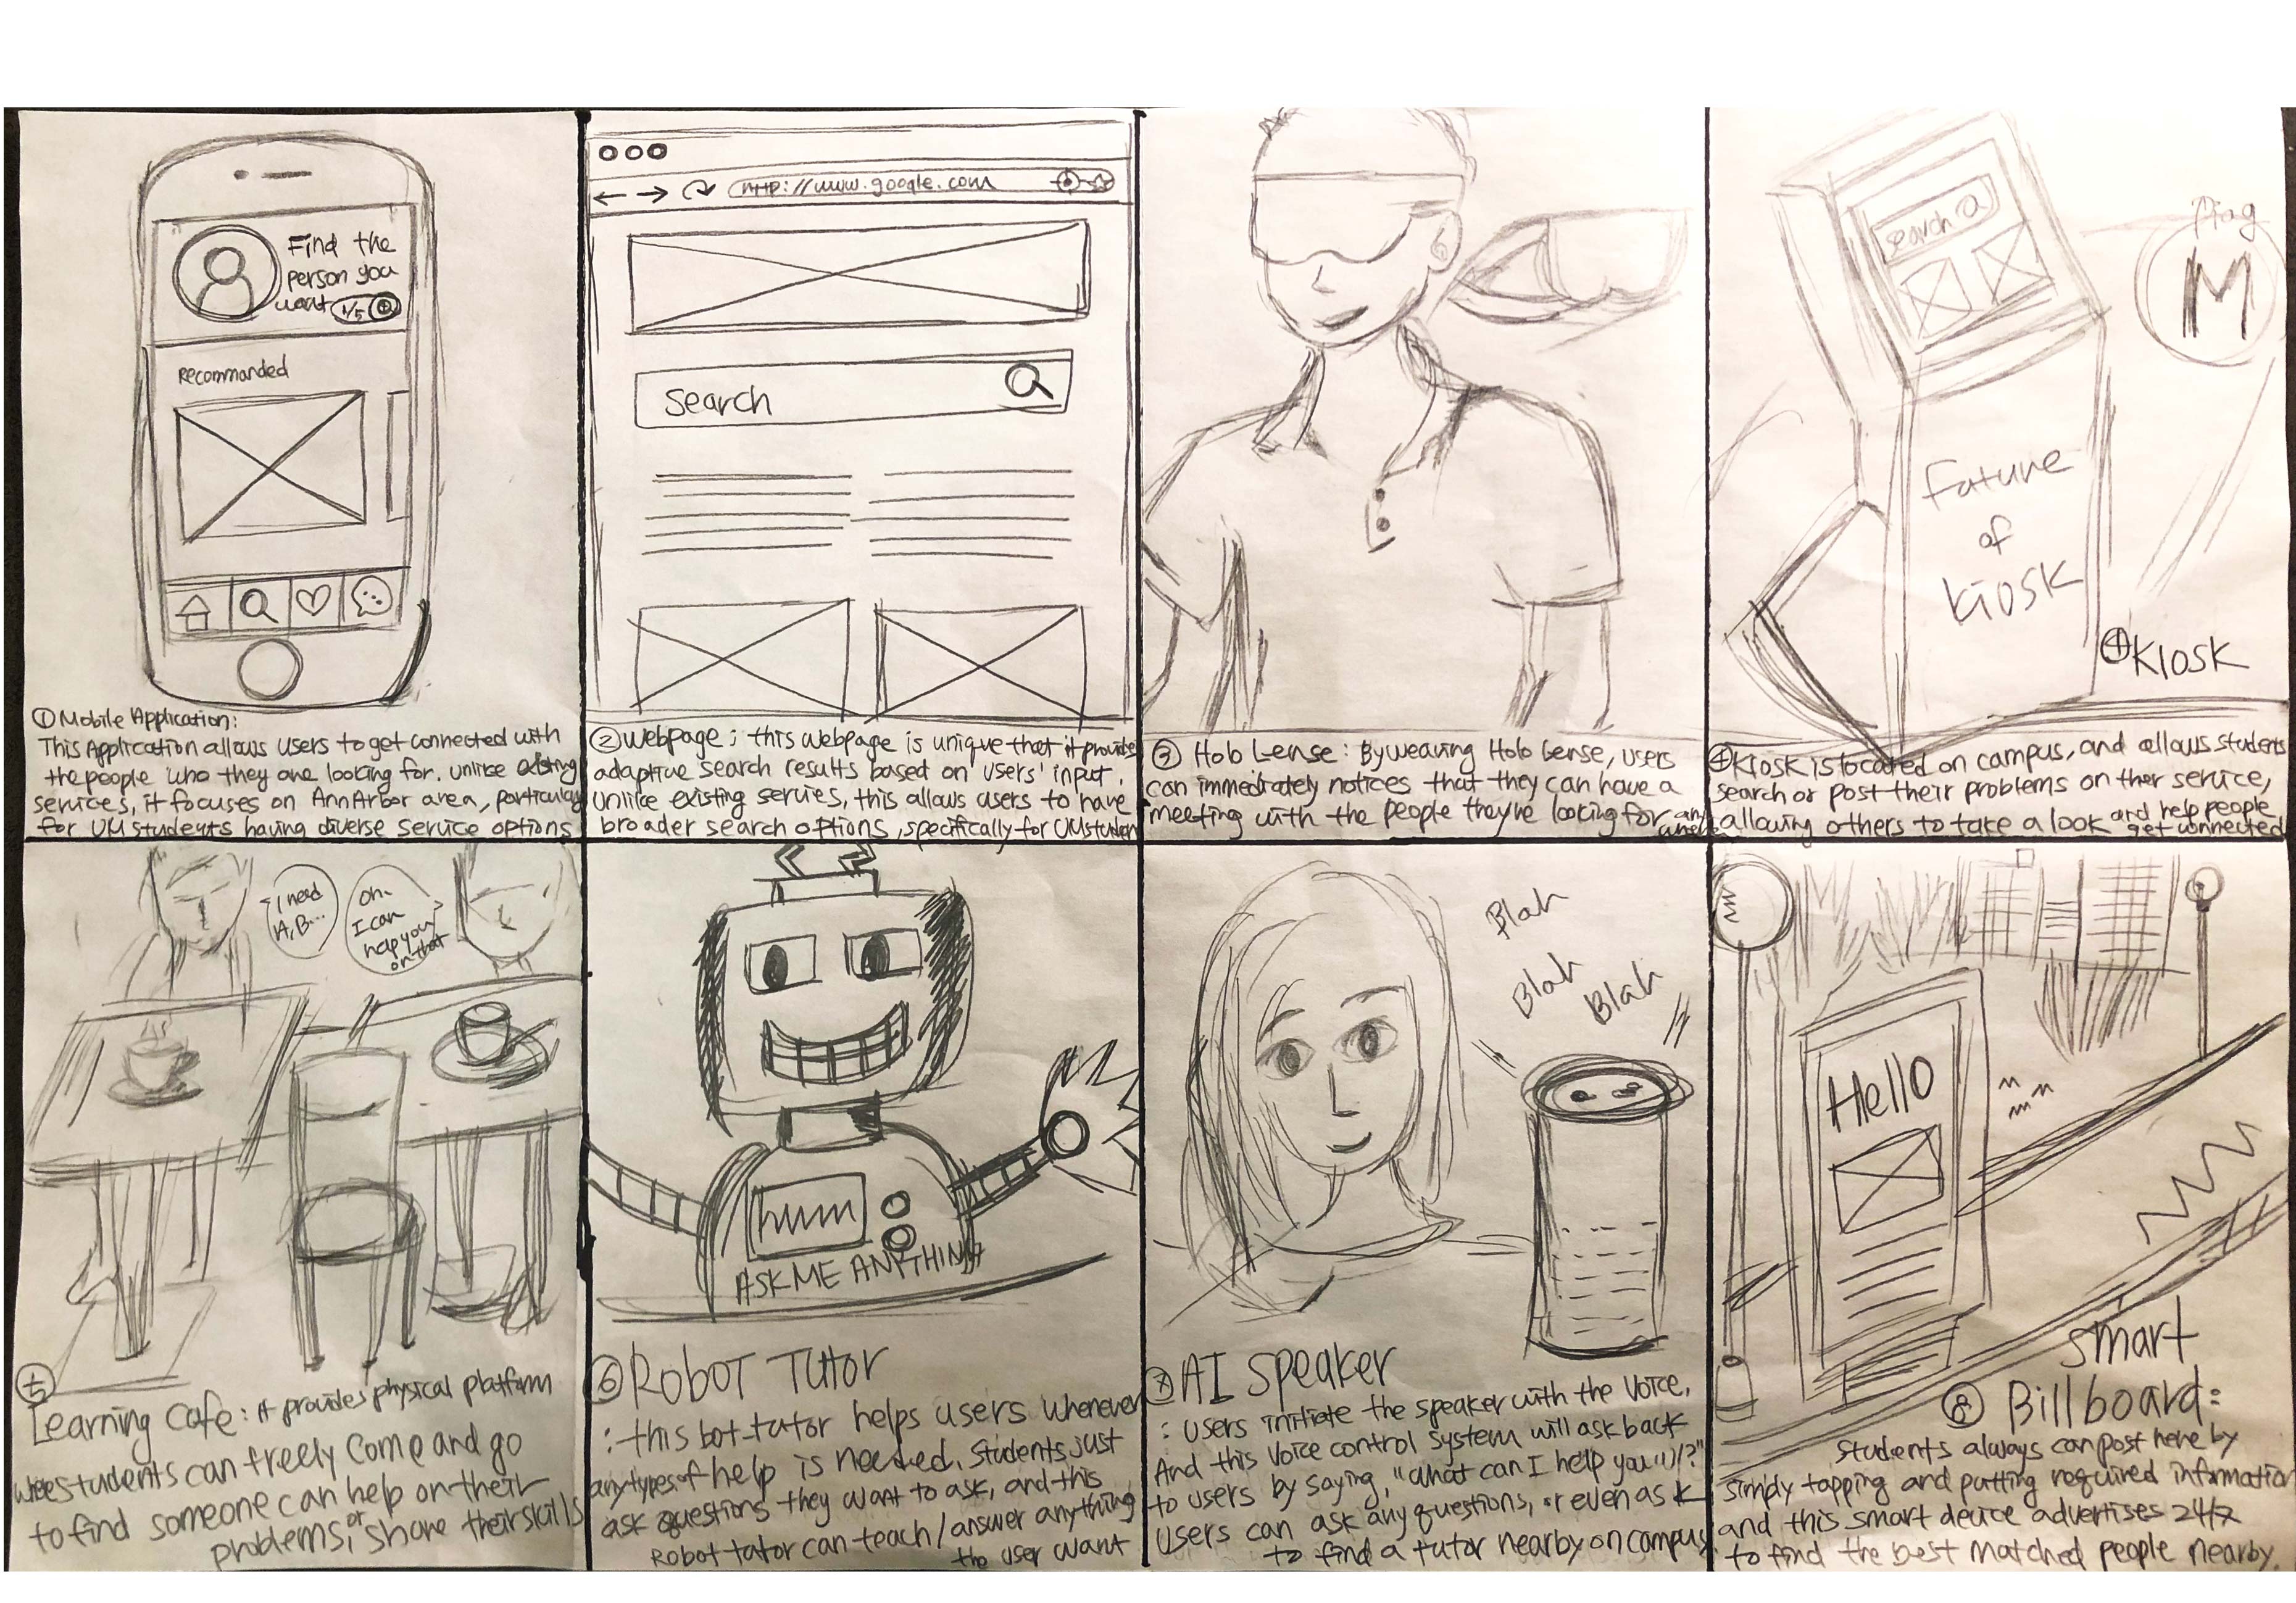
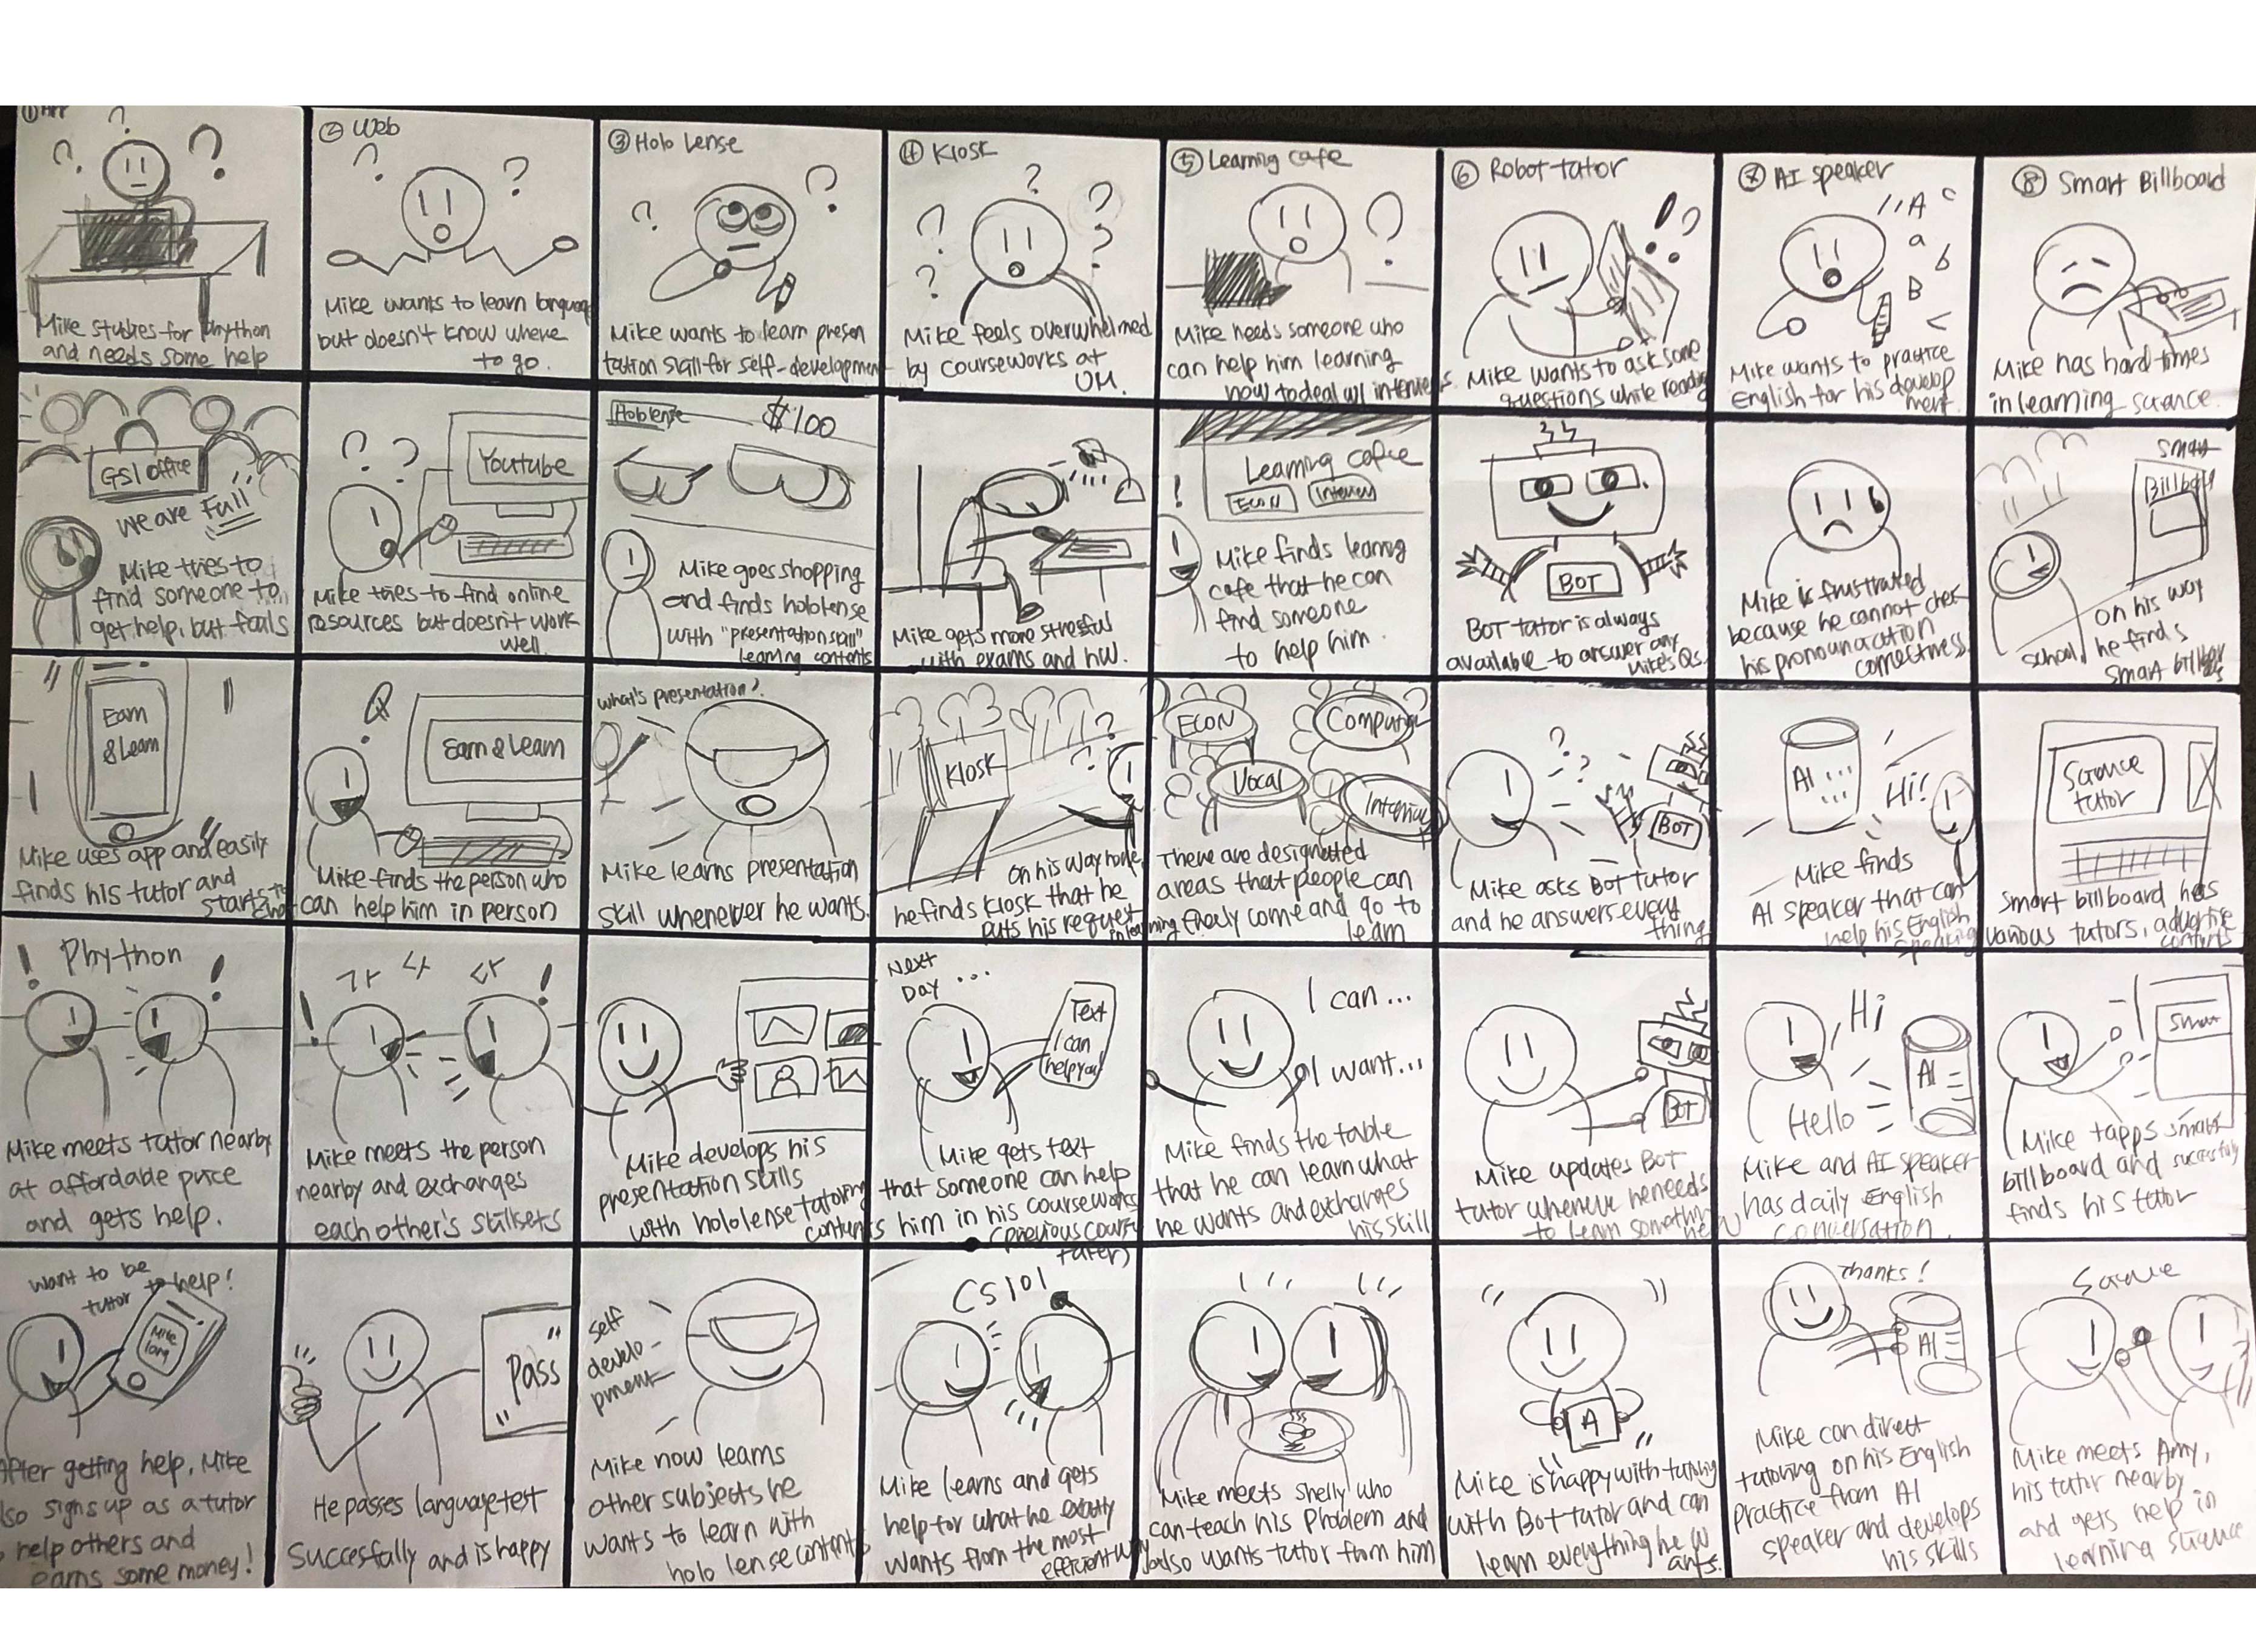
After the brainstorming session, I completed ideation through sketch: I sketched eight possible
solutions to my design
problems, which allowed me to think in different contexts where my system could be used to inspire new,
creative ideas.
After, I sketched user storyboard to help convey our design problem and
solution. By doing so, I was better able to
sympathize with my hypothetical user, and reconsider whether my solution will truly solve the user's problem.
Brainstorming & Ideation Sketch
Finding a good solution
In this stage, I narrowed my scope down to focus on mobile application service.
This is because 1) my target users, mostly students, enjoy mobile application service,
and 2) it is the most feasible solution in the near future.
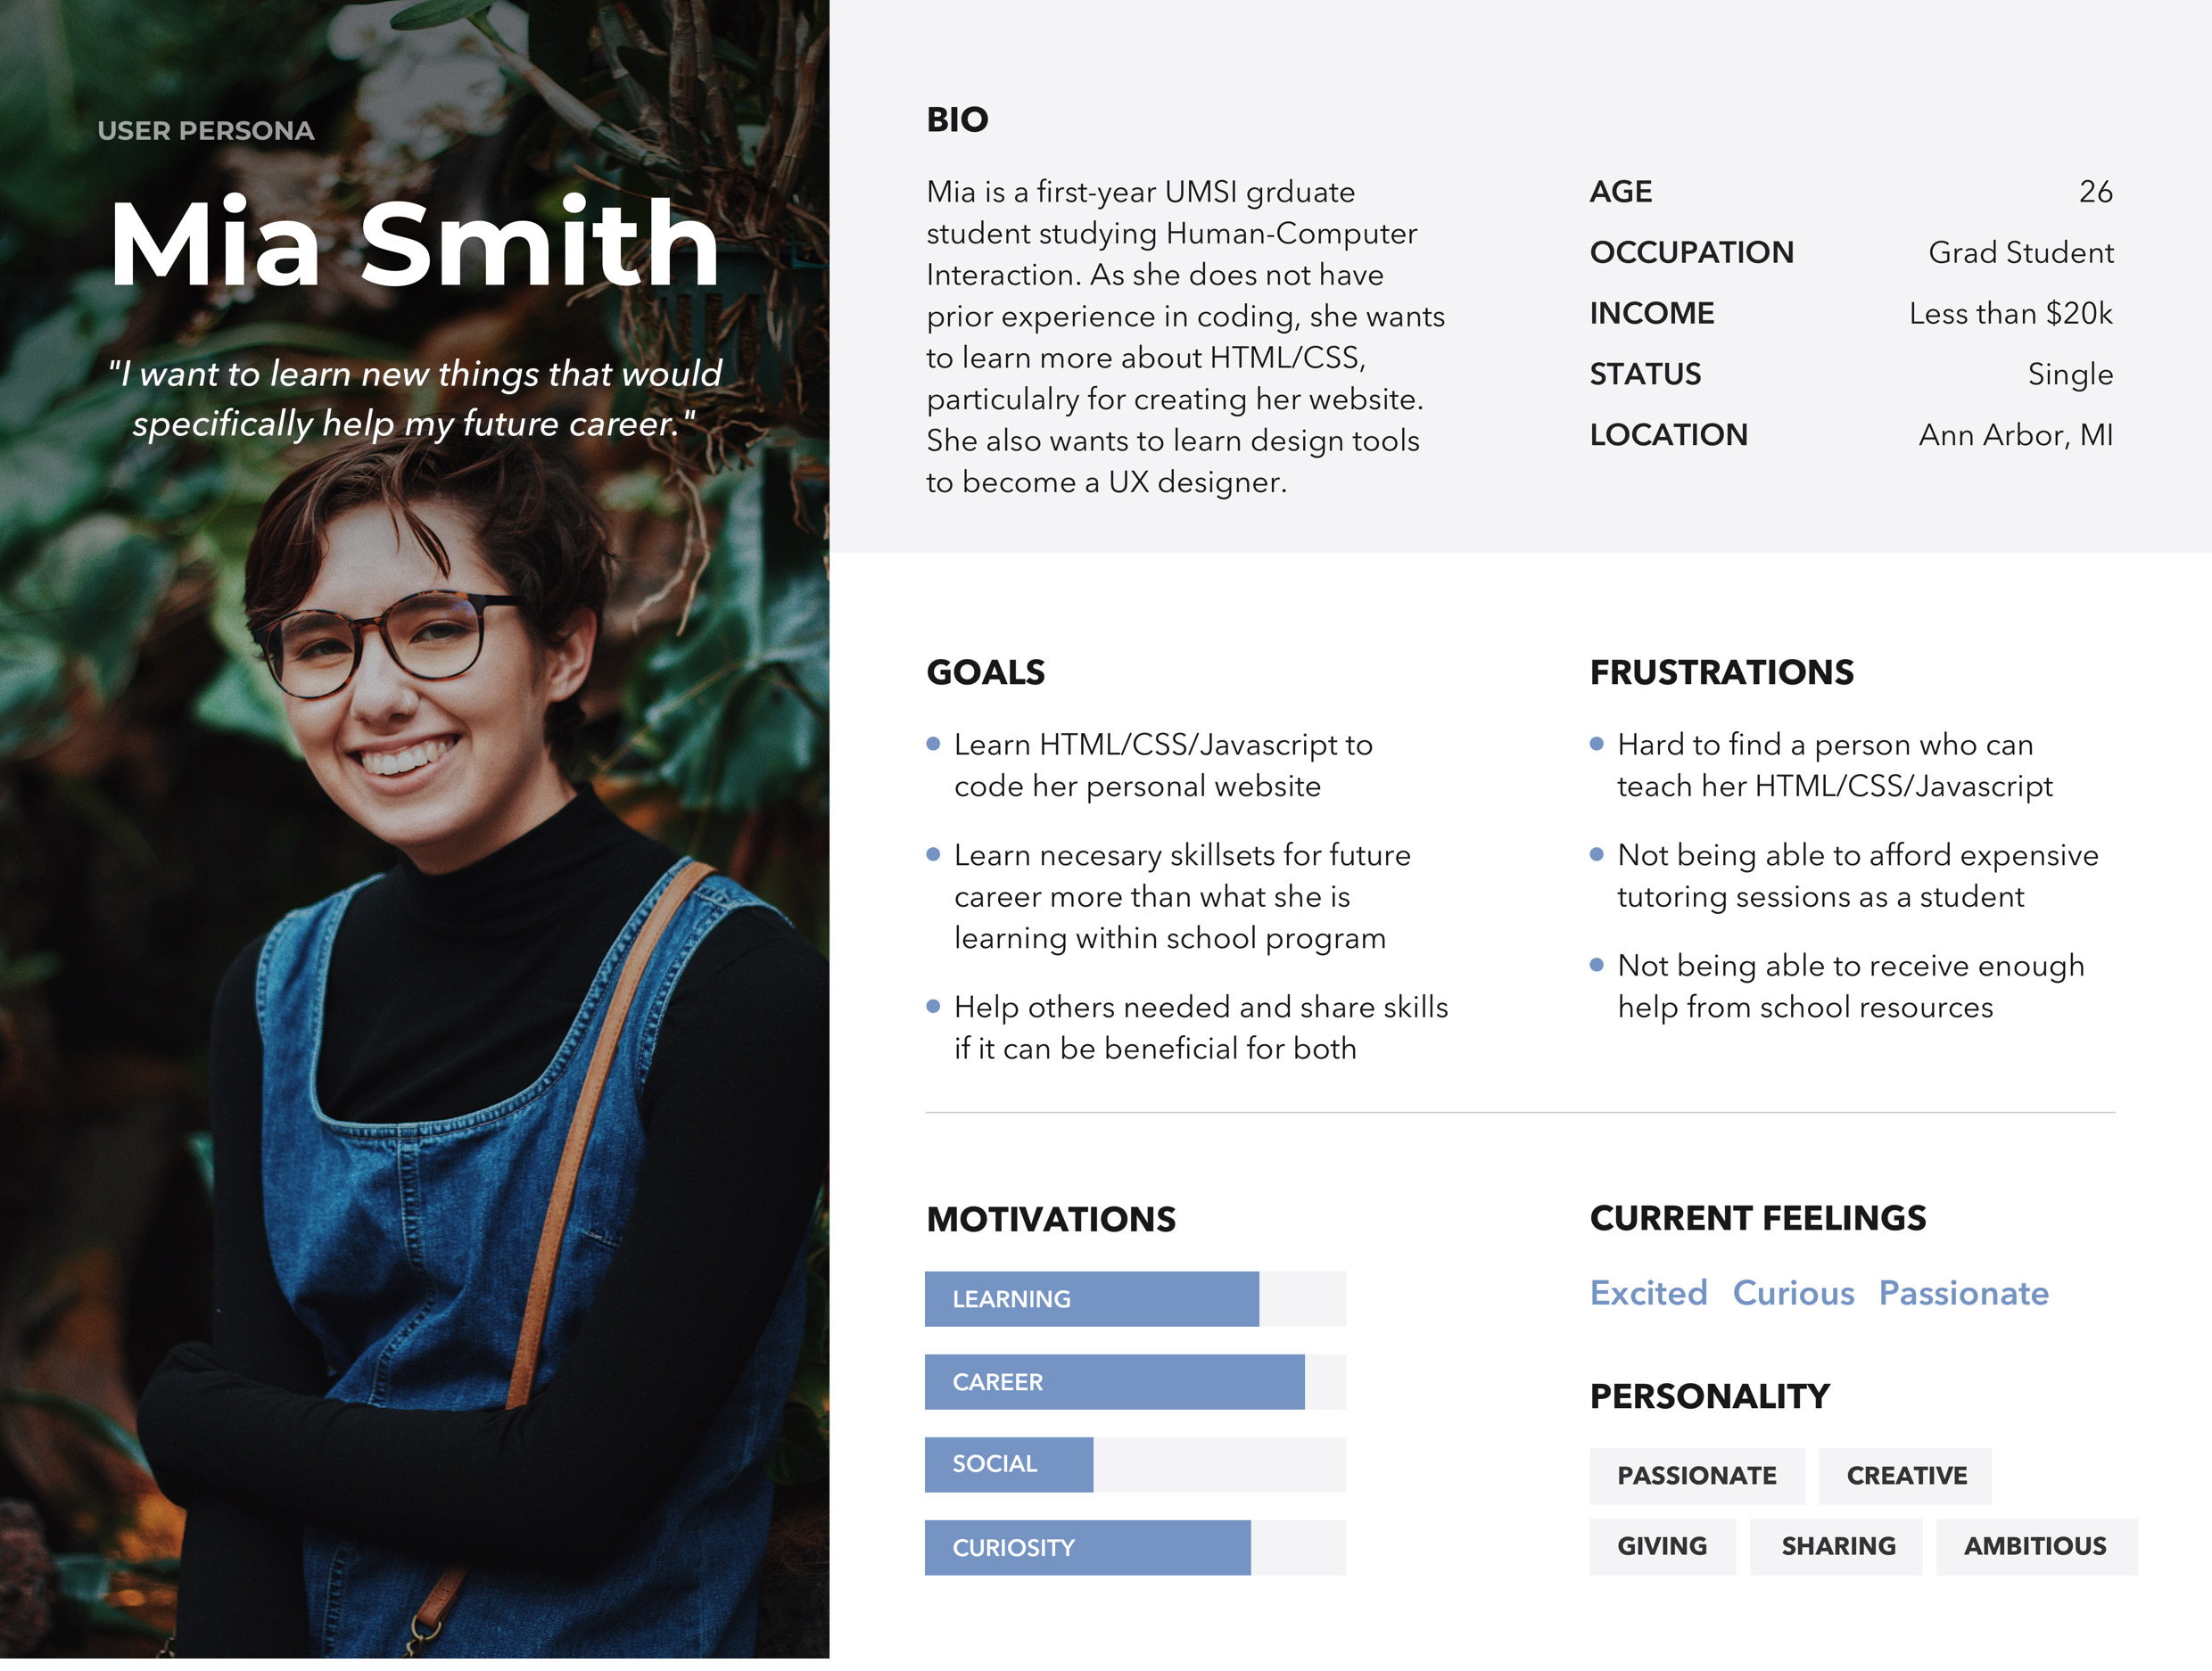
I created three personas and one anti-persona to
better understand needs and goals of my users.
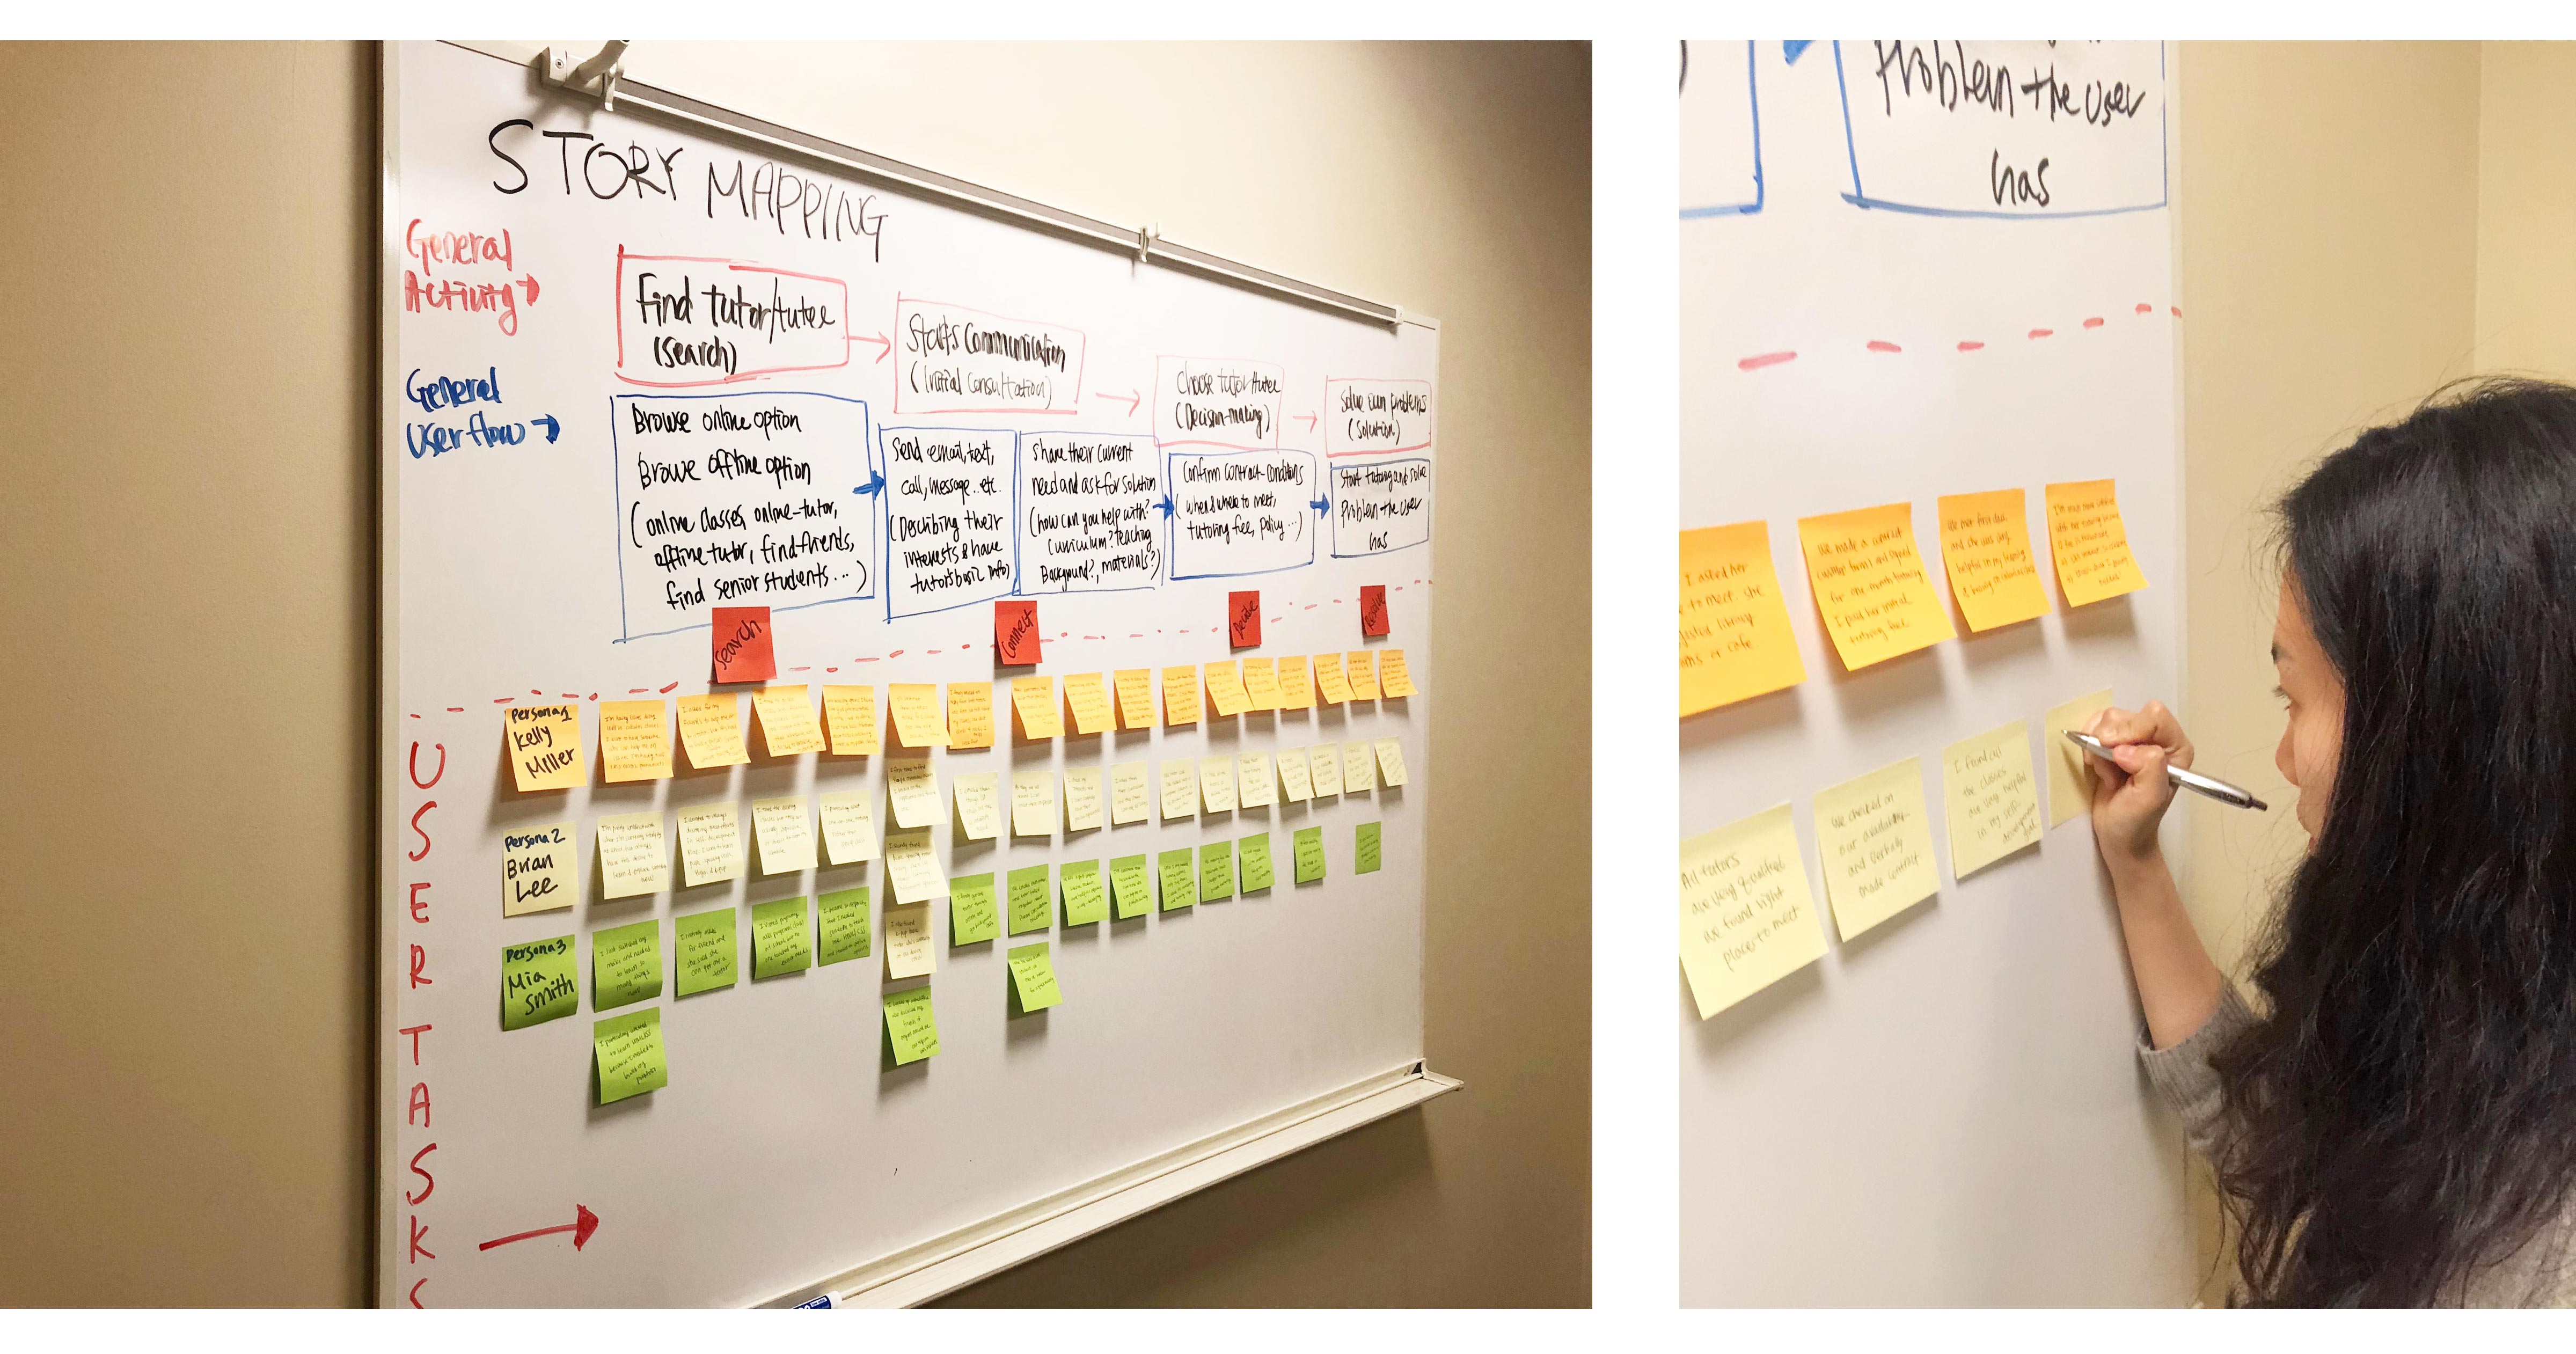
After, I picked my two primary personas and condcuted story mapping for a better
product development.
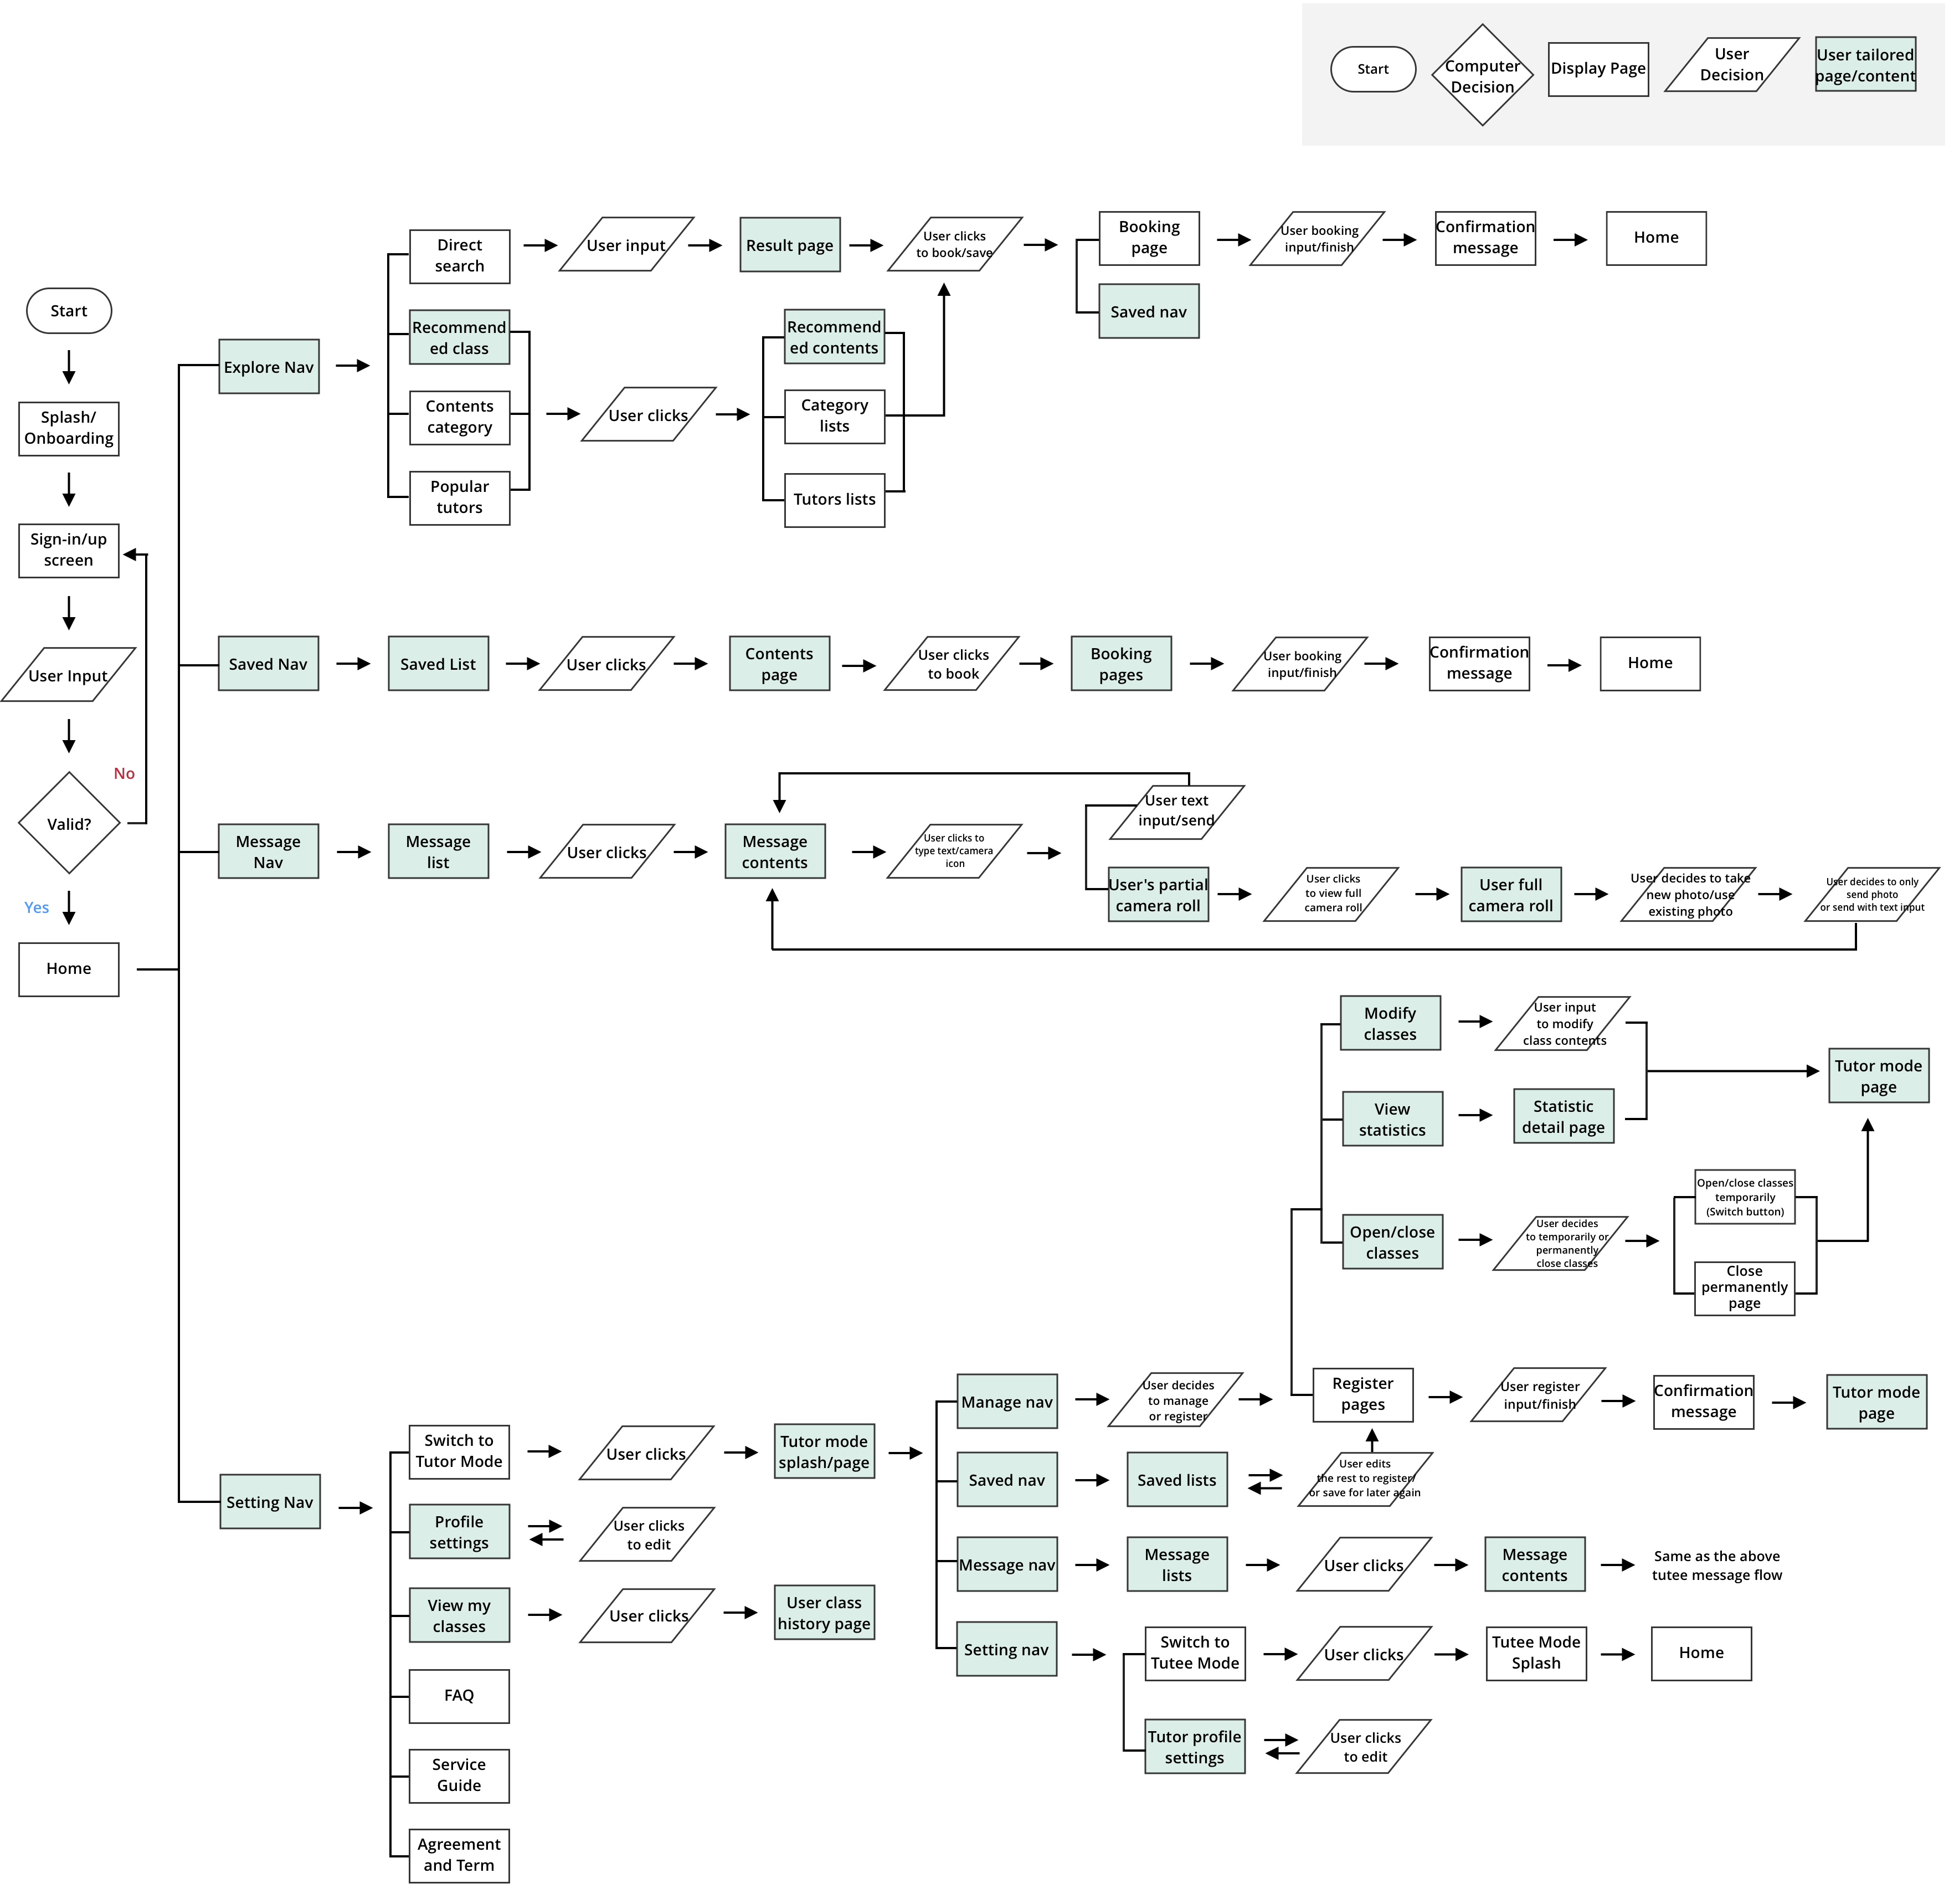
By using all previous efforts, I solidify
user flow chart and draw wireframes. With lo-fidelity wireframes, I conducted user testings and received precious feedback for design iteration.
Personas
I created three personas as target users, one anti-persona to better understand constraints of my service. The below is one selected persona, so click to view all personas for details.
View all personas
Story Mapping

User Flow Chart & Wireframes
After, I was able to solidify user flows by creating user flow chart, and this led me to draw wireframes. When drawing wireframes, I came back to competitive analysis and looked at similar products to better understand their UX/UI design, so I could consider more about the overall experience of my design ideas.
View full user flow & wireframes
Lo-Fidelity Prototyping
I tested this prototype by assigning users various tasks to complete. When the users got stuck, I
asked them to write them down immediately so I could better understand where the breakdowns were occurring.
User Feedbacks from paper prototyping:
1. Allow me to use social accounts to login: Users want to have more flexibility in login experience.
2. Think about accessibility in your product: One of my users who has vision impairment highlighted that I should deeply consider accessibility in my product.
3. Refine "book class" flow:
Users want this platform to only focus on matching tutors and tutees, helping them to arrange their first personal meeting without paying anything.
4. Provide me reliable information on verification for tutors: Trust and safety always matter. Users want to ensure that tutors were verified and trustworthy.
5. Let tutors have right to initiate direct communication with potential tutees: Potential tutors were concerned if random users just contact them without serious interest.
Final Design
Combining all precious feedbacks, I completed my final design.

Reflection
This project gave me two important takeaways.
One: Design iteration based on feedbacks brings powerful results.
I iterated design more than 20 times including all small interactions and adding/subtracting contents. I tried not to miss one single feedback. I took it seriously and deeply thought about how I could translate it into my design.
By iterating design processes, I can see that my solution is becoming more solid and importantly, becoming user-centered. It also helped me to deeply empathize with my users. I've learned that be open to feedbacks and analyze it critically brings much more powerful outcomes than I expected.
Two: Designing for accessibility and social impact.
As having more and more interactions among users, I was able to further consider what and how my solution can bring positive social impact to the community for everyone regardless of their ability, context, or situation.
I thought about appropriate color contrast of my whole design, adding more indicator such as text labels or patterns when showing success/error message, having clear focus indicators, etc. Through the process, I deeply felt responsible for designing for everyone, realizing importance of inclusive design.
View More Projects